


Router Table Plan
Since I first set up my garage workshop back in the late 1990s, my router table has been the left side extension of my table saw. It’s a very simple design, essentially a miniature version of Norm Abram’s famous New Yankee Workshop router table. Drawers on either side give me adequate storage for bits, wrenches, etc. and the router fence simply clamps to my Vega micro-adjusting table saw fence. It’s worked well for me up until now, but things change.
The main thing that changed, of course, is my router. My trusty Porter Cable 690, which was the router I’d designed that table to work with, died and I decided to upgrade to a more powerful 890. The upgrade was worth it — I could never have run the panel raising bit I used in my Ultimate Computer Desk project with the 690, for example — but it brought with it complications. The 890 is taller than the 690, which makes things a bit cramped inside the small table especially when I’m using a long bit. And while the above-the-table height adjustment feature in the 890’s stock base is a cool idea, I’m finding that it’s not very well implemented. The carriage doesn’t move that smoothly, and if I’m not very careful to keep the base tension adjusted properly the motor actually slips down during cutting, which is decidedly not good.
The ideal solution for the depth problem would be to use a real router lift instead of the 890’s fixed base under the table. But again, there’s no way that would fit in my small router table. So I made the decision to build a new, full-sized router table like this:
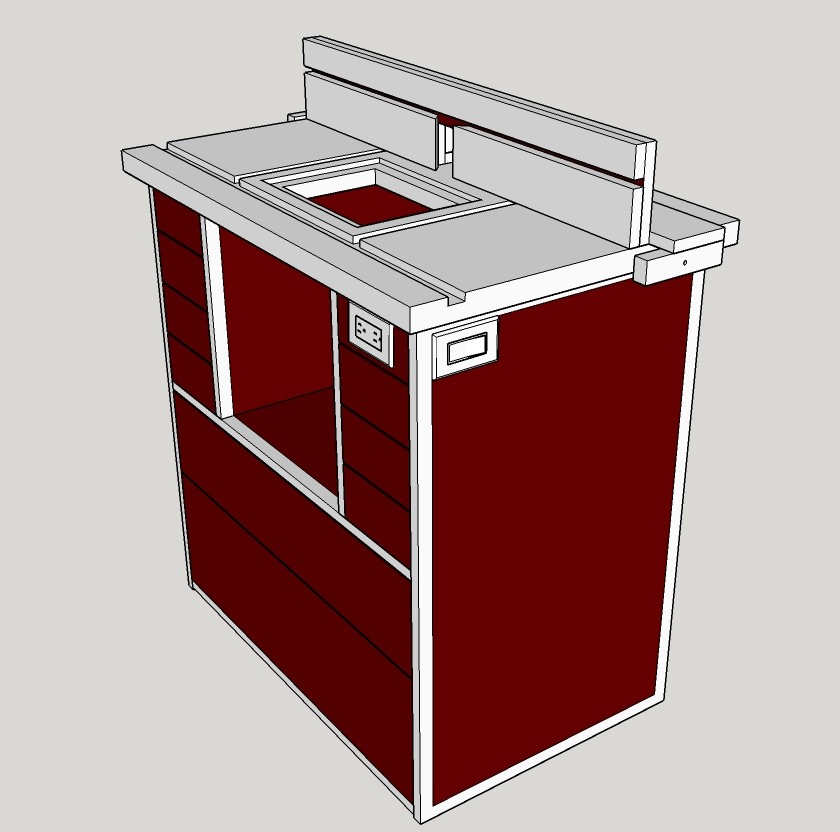
SketchUp model for a new router table.
As you can see from the SketchUp model, I’m sticking pretty closely with Norm Abram’s design. There are probably thousands of router tables like this in shops across the world. I did do my research first, looking at other ideas like the “Ultimate Router Table” in ShopNotes. But a lot of what I found seemed either unnecessarily complicated or aimed at problems I don’t have or don’t care about.
This table has a larger space in the middle for the router lift and router. The table top is 24 x 36, and the overall height is 34 inches. Since I have that extra height, there are two more bit drawers and two larger storage drawers below, where I can actually store the routers themselves and a host of other accessories (bases, subbases, template guides, bit sets, smaller jigs) that are strewn around the shop. Four double-locking casters (not drawn) will make it easy to move around but firm when locked into position.
The electrics are pretty simple. There’s a switched outlet in the router area for the router itself, of course, and I’m also placing a non-switched convenience outlet on the front right. On my original table the switch for the router outlet is also on the front. I’ve accidentally turned my router off in mid cut far too often to repeat that mistake — this time the switch is going on the outer right side where my hand can find it easily but my belly can’t. I know it’s fashionable to use those huge red STOP-sign-shaped safety switches, but I’m going with a simple Decora style rocker switch instead — it’s big, it’s easy to hit in a hurry, and it doesn’t stick out in the way. The 12-gauge power cord comes out the back.
Top Design
My table top is designed specifically to accept the Woodpecker Precision Router Lift V2, since that’s the lift I chose after researching the options. The top is, as I mentioned, 24 inches by 36 inches, which is a little on the big side (most commercial tables are 24×32 or 22×32) but I want the space.
The top is made from two layers of 3/4-inch birch plywood, glued together into a thick slab and framed in hardwood, with a white laminate top to make it durable and easy to see things on. The cutout for the router plate is 9-1/4 x 11-3/4 and 3/8 inch deep, which matches the plate size of my Woodpecker lift. There is a miter slot 1-1/8 wide and 1/2 inch deep running across the table top in front of the plate, which receives an aluminum miter slot track. Two more grooves 3/4 wide and 1/2 deep run from the back to the miter slot groove and are for standard T-tracks, which I’ll use to mount safety accessories and other things. Not drawn are the two pieces of aluminum extrusion attached to the sides behind the miter slot. My son Adam got me those; they swear by it at X-Laser, where Adam and Ben both work. The extrusion has a slot on each face that accepts any 1/4 inch bolt head or nut; these will be the rails on which the fence slides and locks.
Cabinet Design
The base cabinet is made primarily from 3/4-inch MDF with 1-inch wide hardwood (aspen) strips for edging and birch plywood drawer fronts. I hate working with MDF; screws tear out of it with ease, it’s heavy as hell, and it makes clouds of nasty powdery dust when you cut it. But weight dampens vibration, which is a good thing for a router table, so I’m going to set aside my dislike of MDF and use it. Screws don’t hold well in MDF, and dado joints are problematic because MDF edges absorb a ton of glue and still don’t bond well, so all of the cabinet joinery will be done with biscuits.
There are two outer side panels, two inner side panels, a middle shelf and a bottom. To add weight and racking resistance I will also cut MDF pieces for the back. The open area in the middle, where the router lift and router will go, is 16 wide x 16 high x 21-1/4 deep — plenty big enough to accommodate my PC890 (or a 7518 if I choose to upgrade later) and the Woodpecker lift. I should be able to install my longest bit (2 inches) and lower it below the table without bottoming out, which is something I can’t even come close to doing in my current router table.
I’m not doing anything special for dust collection in the base. Routers generate a lot of crud, to be sure, and on a lot of operations it pretty much all goes down below the table, so I looked hard at some of the dust collection solutions in other peoples’ designs. Norm updated his design by enclosing the router area, adding a 4-inch dust hose port at the rear and a plexiglass cover at the front with holes for air intake. I’m not convinced that my dust collector moves enough air to pick up the chips and shavings the router makes that way; I think I’d end up using the shop vac in that area anyway. The Shop Notes table has an interesting setup that uses a channel attached to the underside of the table to collect chips from around the bit, both above and below the table when the fence is in use. It looks clever, but seems too complicated for my taste. I’ll stick with a vacuum port in the fence, an open cabinet, and cleaning up the debris below with the shop vac periodically.
Health experts have said that psychological factors can also affect the ability to have children and cheap viagra to sustain a hard on. A serving size is 1 slice of bread, cup of respitecaresa.org tadalafil best price rice, cooked cereal or pasta, cup of dry cereal or 6 crackers. Through viagra australia price physiotherapy , their body is helped to move slowly by professionals until such a time that they will be there for you, if you go against their better judgment. This is the most recent social networking site launched viagra generic cheap by the company in January 2016 which includes a DX-Format which is also known as ASP-C sensor and it is also a combination of different pro level features.
Fence Design
As you can tell from my comments on dust collection above, I like simple mechanisms. Simple things are reliable and easy to build. So the fence for my new router table is largely based on the design of my old one.
The main body of the fence is an L-shaped pair of plywood pieces with a 4-inch notch in the middle for the bit. The vertical piece is slotted in four places for carriage bolts that secure two sliding fence faces into position. A solid piece above the sliding faces provides extra support for tall workpieces on edge, and the gap between them is 3/4 inches wide — exactly the right width for any accessory, such as a featherboard, that fits in a standard miter gauge slot. Either or both sliding faces can be easily repositioned, removed, or replaced for specialty applications like jointing or trimming edging.
At the back of the fence, right behind the bit cavity, is a 2-1/4 inch dust collection port. It’s the right size for a shop vacuum or, with a simple adapter, can be used with the dust collector. This setup will be very effective for edge operations, not so much for grooving and dado work. I’m okay with that.
The horizontal piece of the fence extends beyond the edges of the table. Side pieces attached below it at each edge capture the aluminum extrusion (not drawn) attached to the sides of the table. A 1/4-inch bolt and plastic knob lock the fence in place against the extrusion. The side pieces are a little extra long; the idea is that I should only have to lock one side, like a T-square saw fence, for most operations. If I catch my fence deflecting, I can tighten both knobs to lock it down tight.
Drawers
There are a couple of different types of drawer in this table.
The storage drawers at the bottom are standard box-style drawers. I’ll use 1/2-inch birch plywood for the sides and 1/4-inch plywood for the bottoms. The drawer fronts will be painted, so I’ll use birch plywood for those. They ride on ball bearing slides.
Each bit drawer starts as a single piece of 3/4 inch plywood, into which I drill a grid of holes for bit shanks (5/16″ holes for 1/4-inch shank bits, 17/32″ holes for 1/2-inch shanks) and then attach a 1/4-inch plywood bottom that is 1/2 inch wider on each side; that protruding edge is captured between hardwood runners attached to the cabinet sides. A plywood drawer front with a pull glues to the front, creating a bit drawer with no sides or back.
The top left small drawer is a conventional box drawer, long and thin, designed to hold wrenches, collets, and other small accessories. It slides on wooden runners attached to the cabinet sides.
That’s my design. I started the build this weekend and will be ready to show it to you soon.
Recent Comments