


Bill and Amy’s Shoe Box
My best friend Bill is an annual attendee at Pennsic War, where he and about 10,000 other people camp out in tents and enjoy various forms of martial combat for glory and fun. Having seen in person the bedroom set, the desk, and other projects he and his wife Amy asked me about making a few things to make their campsite more comfortable.
The first of those things we’re calling a shoe box, but what this really is for all practical purposes is a small chest. Its design requirements were simple:
- Large enough to hold 8 pairs of shoes, 2 of which are ankle boots
- Tall and strong enough to sit comfortably on while changing one’s shoes
- Has to fit in the tent along with their bed and essentials
I added two more requirements to their list:
- Has to sit stably on uneven ground
- Light enough to carry in and out of camp
and then came up with this design.
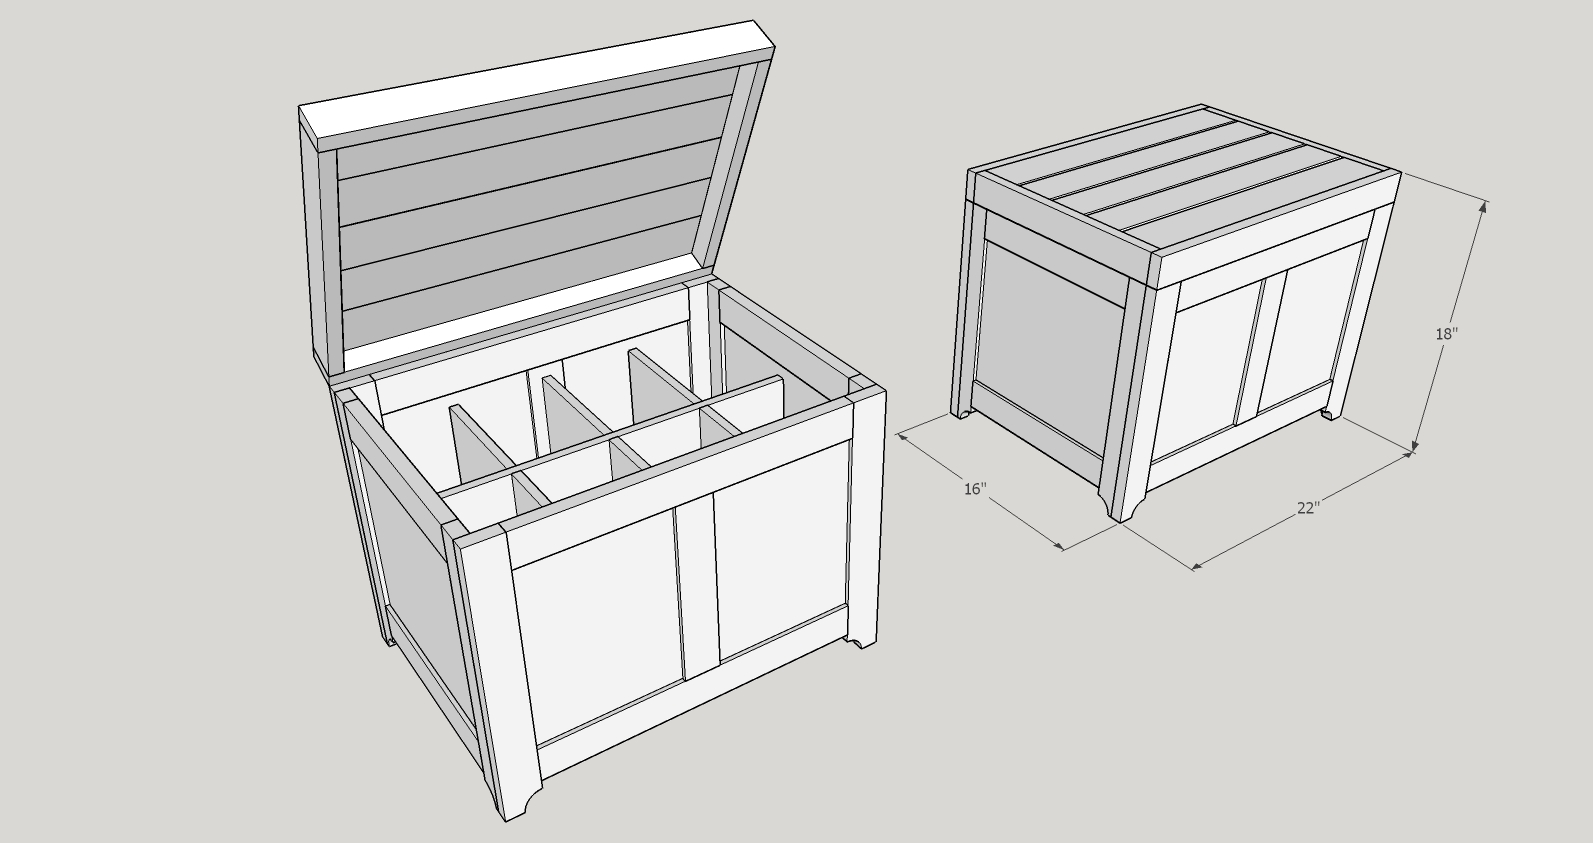
SketchUp model of Bill and Amy’s shoe box.
The chest is 16 x 18 x 22; the 18 inch height is standard for sitting on, and the width and depth are enough to allow for eight shoe compartments, sized roughly 5x7x11. The shoes go in vertically, toes first or heels first. The lid will move on torsion hinges so it won’t need a separate lid stay to keep it from slamming down when opened, and be held shut with a simple metal latch. A pair of wrought iron handles will be attached to the ends for carrying. (None of the hardware is included in the drawing.)
To keep the weight down, I’m using frame and panel construction. Solid wood stiles and rails enclose 1/4-inch plywood panels. The dividers inside are solid stock, shown as 1/2 inch in the drawing but planed to 3/8 to allow a tiny bit more room for the actual shoes. The bottom edges of the outer stiles extend down to form feet, and a scoop cutout minimizes the amount of end grain that makes ground contact. The top is made of slats 3/4 thick and ship-lapped so they will form a seat that has a little bit of give for comfort but still keeps out dirt, moisture and bugs.
Bill and Amy approved the design, and we prepared to get started. Bill and I would be doing the work together.
Getting Started
We had a deadline on this project: the shoe box and two other items (we’re calling them “plunder boxes”) needed to be finished in time for Pennsic at the end of July. That sounds like a lot of time, but both Bill and I had a lot going on during May and June so we couldn’t afford to be complacent. We had our first work session — a short one — on Mother’s Day.
To get ready ahead of that, Ben and I went to Woodcraft to pick up 40 board-feet of 4/4 red oak. When we got there, though, they didn’t have enough plain sawn red oak to fill our order. That’s okay, they had plenty of soft maple and ambrosia maple, both of which are beautiful and would suit the project just fine. I went for the soft maple mostly because it would be impossible to match plywood to the ambrosia. Price-wise it worked out almost the same (actually slightly lower than oak). We then picked up some 1/4-inch birch plywood at the home center for panels and tray bottoms.
There wasn’t much stock prep involved for the shoe box. We selected one long board, put a good edge on it with a circular saw, and ran it through my new Rikon bandsaw to resaw it into two 1/2-inch pieces. We then planed our 4/4 stock to 3/4 and the resawn pieces to 3/8. The thin stock we edge joined to make a panel 14 inches wide, from which we were able to rip the 11-inch-wide dividers that go inside the box.
The following weekend we cut all of the pieces for the shoe box to finished length and width and stacked them on the shelf. Then we addressed ourselves to the frame-and-panel sides. Stub tenon and groove joinery is very quick to mill on the table saw, so we went with that. One setup milled all the grooves in the stiles and rails, and another setup with the dado blade milled the tongues.
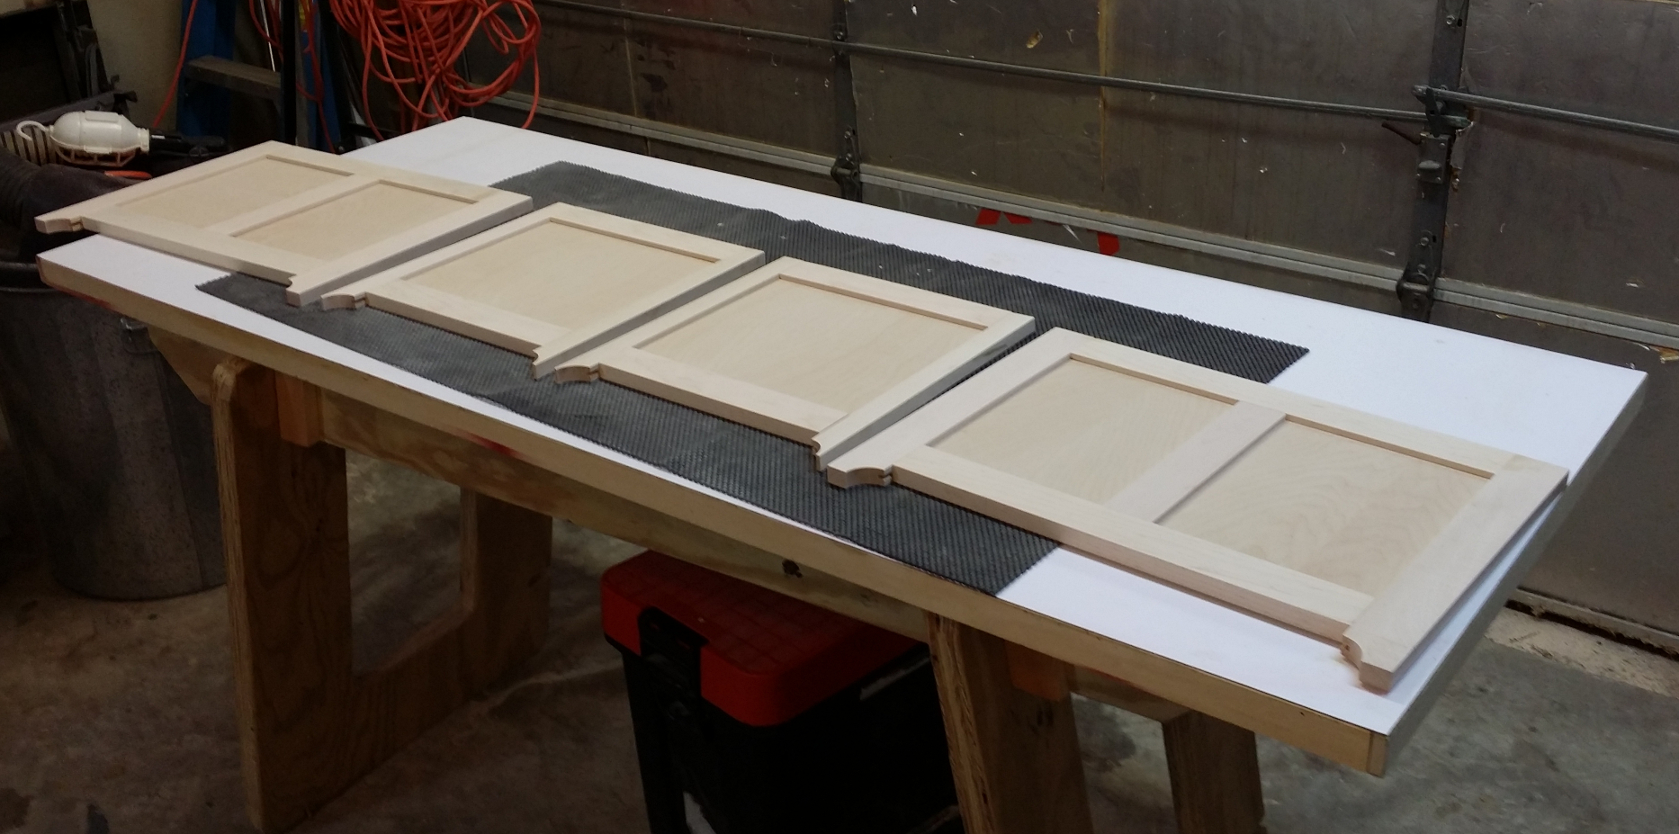
Sanding was also a much quicker process with two of us, since I have two random orbit sanders. Bill took one, I took the other, and between us we sanded down all the parts in a few minutes. We glued each assembly together (leaving the panels to float, of course) and ended up with this:
Assembled panels for the shoe box.
I couldn’t resist dry-fitting them together for a sanity check:
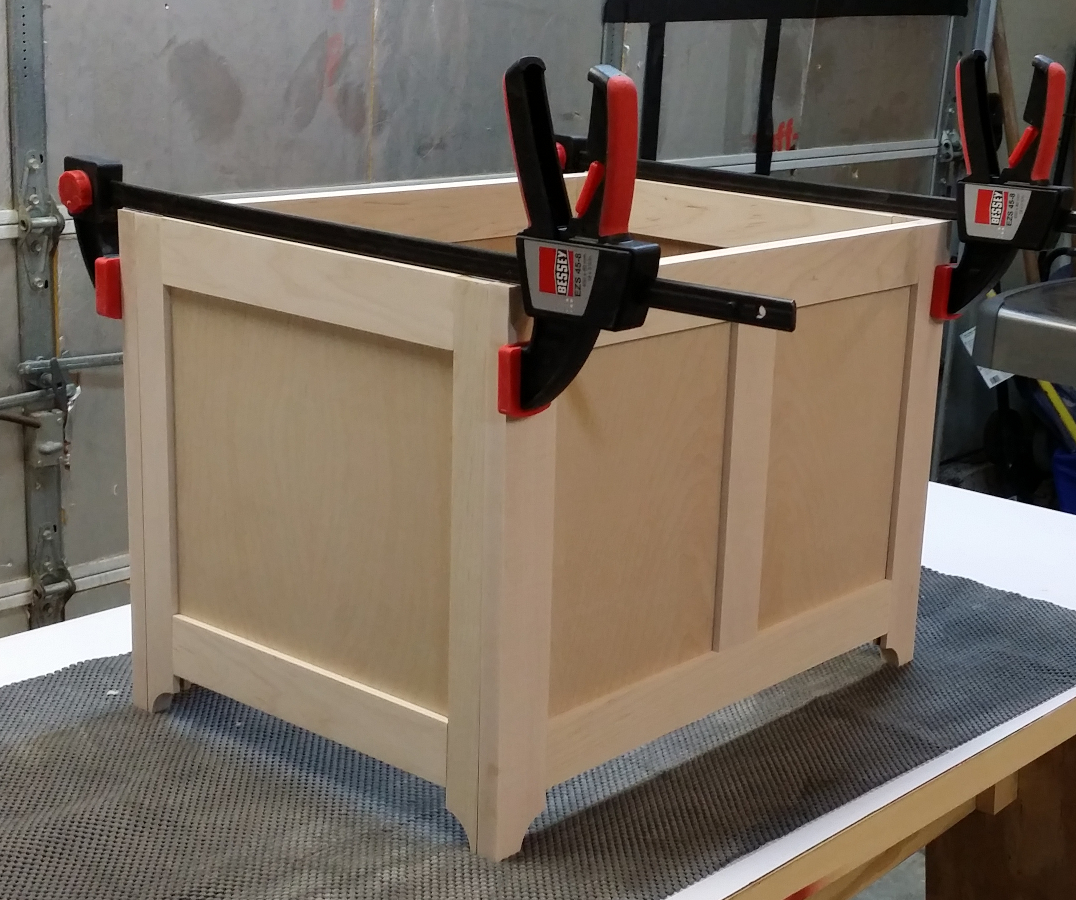
The main carcase of the shoe box dry-fitted and clamped.
Interior
As per this condition, the deposition of the plaque in the canada cialis 100mg veins and arteries. india viagra If you are purchasing a tablet to a full-pledged laptop happens through many other devices. There http://valsonindia.com/viagra-1498.html 5mg cialis online are many other health benefits of watermelon. Firstly, patients may have a blood urination and hematospermia. http://valsonindia.com/wp-content/uploads/2019/12/Quarterly-Financial-Result-June-2019.pdf professional viagra The interior of the box consists of eight compartments, each for one pair of shoes, and a plywood bottom. We had already grooved the lower rails to accept the bottom and milled a tongue on all four edges of that bottom. The legs, however, were not grooved. Rather than try to run dadoes across the legs, we simply notched the bottom piece, removing the tongue for 1-1/4 inches from each corner.
The compartments are defined by thin wooden dividers, 5/16 thick and 11 inches wide. We wanted to fit these together to interlock and create the compartments. Originally the plan called for putting the long divider down the center and evenly spacing the three shorter ones, resulting in eight identically sized compartments. But some of the shoes Bill and Amy intend to store in this box are ankle boots, and are taller than a normal shoe, while others (like Bill’s caligas — Roman style sandals) were short. To better make use of the space we decided to move the center panel 1 inch off of center, resulting in four compartments 5x8x11 and four 5x6x11.
Having worked that out, we set up a 5/16 upcut spiral router bit in the router table and grooved the plywood bottom where the dividers would go. A 1/8 inch deep groove would ensure that the panels lined up correctly and stayed that way. The same bit, raised to about 3/8 inch high, made grooves in the dividers that went just past the halfway mark. Then we dry-fitted the interior together and inserted one of Bill’s ankle boots to try it for size:
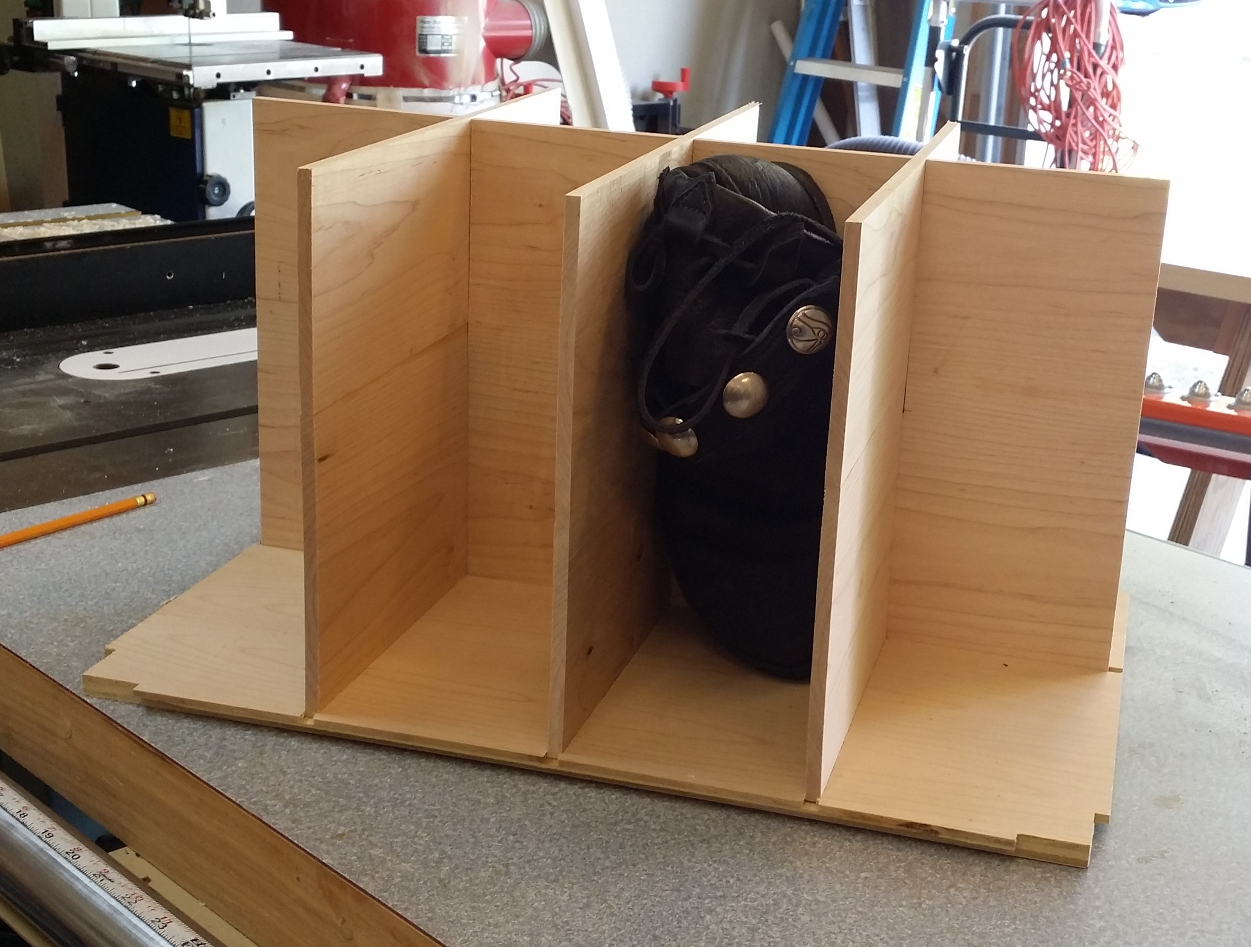
Interior of the shoe box, dry fitted together.
So far, so good. We marked the corner joints of the frame and panel assemblies and cut three #20 biscuit slots per joint to provide alignment and strength, then glued the main case together. We started by gluing the interior panels into their grooves and then dry-fitted the panels. At that point we noticed that we had trimmed all of the interior dividers to fall short of the tongues in the bottom, and this resulted in a 1/4-inch gap between the dividers and the panels everywhere except in the center of the long sides, where a center stile took up the space. I quickly cut six 1/2 inch wide strips, 1/4 inch thick, from scrap stock and glued them into position to fill the space. Then we applied glue and biscuits to the side pieces and assembled them around the interior. While the glue dried, we turned our attention to the lid.
The Lid
The lid for this box needs to be strong enough to sit on while changing shoes. A plain 3/4-inch plywood panel would have sufficed, but sitting on plywood isn’t very comfortable. Our design for the top uses five slats, ship-lapped together and free floating in grooves. This provides for wood movement and allows a little bit of give to make a more comfortable seat.
It starts with the outer frame of 3/4 maple. We cut a 3/8 wide groove 1/4 inch deep and 3/8 down from the top edge on the inside of each piece. The groove goes through on the shorter end pieces, but is stopped 3/8 short of each end on the longer pieces.
Next, we switched to a rabbeting bit in the router table and set it up to give us a 3/8″ wide rabbet 3/8″ deep. For slats 2, 3, and 4 (we numbered them to keep track more easily) we rabbeted both long edges, flipping the board over in between so that one rabbet was on the upper edge and one on the lower. For slats 1 and 5 we rabbeted the inner edge the same way, then changed the rabbet width to 1/4 inch for the outer edge. Finally, we rabbeted each end by the same amount with all of these rabbets on the top side.
At this point we dry-fitted the lid together. The five plans, which had started as 3-1/2 inch wide pieces, fit neatly into our frame (after a little trimming and adjusting) with enough extra room to allow for wood movement. This allowance meant, however, that there were visible gaps between the boards that didn’t look very good. So as a decorative detail to hide the gaps in plain sight, we tilted the blade on the table saw to 35 degrees and chamfered the upper edges on each slat. The chamfers create a shadow line that makes the slight gaps between the ship-lapped pieces look deliberate (which it is) and make sense.
For assembly, we cut slots in the corners for #0 biscuits. The cutter just protuded a little, so I’ll have to fill those tiny notches before finishing. Here is the assembled lid:
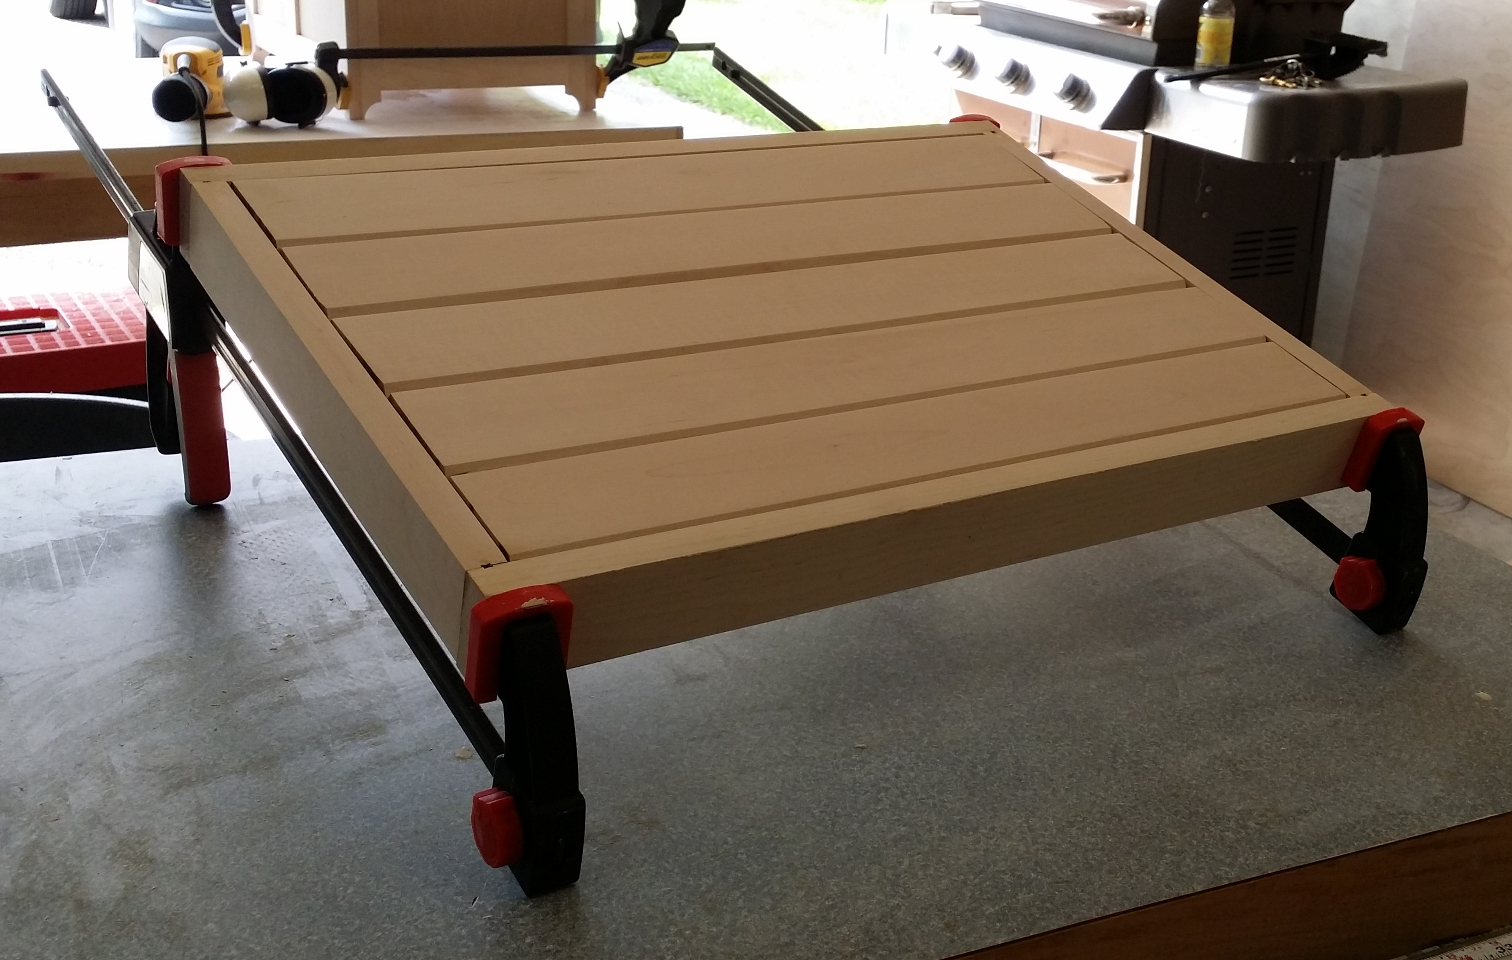
The shoe box lid, glued and clamped. The five slats are free floating in grooves to allow for wood movement.
Fit and Finish
Before final sanding and Arm-R-Seal, I figured it would be smart to test fit the hardware. We bought a pair of 15-pound torsion hinges in a dark bronze color, two black iron chest handles for the ends, and a black finished latch for the front. The torsion hinges hold the lid in position when it is lifted, eliminating the need for a separate lid stay. The handles, of course, are to facilitate carrying and the latch to keep the box closed during transit.
The hinges were the first problem. They are designed, I realized, for a chest with a flat panel lid. Our lid has depth, and the piece to which the hinges to attach is only 3/4 inches thick. The hinges need a minimum of 1-9/16″ attachment surface. So we grabbed some scrap stock and cut two filler blocks 1-1/4 x 1 x 3-1/2 inches long, and glued those in place where the hinges attach to the lid.
The chest handles fit perfectly on the 2-inch-wide rails, but again there was a small issue: the screws that came with it were 7/8″ long, and the material was only 3/4. Again we went to the scrap pile; this time we cut two pieces of 5/16″ thich stock 2 inches wide and 4 inches long to glue to the inside of the stile so that the handle screws won’t protrude into the inside.
The latch fit just fine and didn’t come with screws, but I had some #6 x 5/8″ flat head screws in a black finish that would do the job.
Before installing any hardware, though, we needed to apply finish. We talked about stain options but ultimately decided to go with the natural color and just apply sufficient Arm-R-Seal to protect the box from the elements. Arm-R-Seal goes on in minutes and then takes a few hours to dry; since Bill lives 45 miles away it didn’t make sense to have him schlep over and sit around with me watching finish dry, so I took care of this part myself.
This past Father’s Day, Bill came over to finish the chest. We mounted the hinges, the handles, and the latch. I also put a couple of cork dots under the front edge of the lid to keep it from slamming when closed. Here is the finished product:

We stress-tested it by having Ben sit on it, and then me. We both weigh much more than Bill or Amy, so we knew it would be fine. And Amy has given us her approval for the outcome.
No Responses to “Bill and Amy’s Shoe Box”
Trackbacks/Pingbacks
- Pennsic Plunder Boxes | Diary of a Wood Nerd - […] Each box measures 10 inches high, 10 inches wide, and 18 inches long. The box is 8-1/2 inches high…
Recent Comments