


Building a Lapped Lattice
For my king bed, I wanted to do something more interesting than simple plywood panels. Raised panels are nice, but they really didn’t fit into the look of the rest of the set. Instead, I opted to fill my frames with a lattice of solid walnut strips lapped together. A basic square grid rotated 45 degrees presents a diamond-shaped pattern that is interesting to look at and reduces the visual weight of such a large piece. It also presents a few interesting challenges for the construction.
I feel pretty safe using this for an adult’s bed because (A) my children are all in their 20’s and 30’s and (B) there will be a mattress or a wall immediately behind each lattice, which should prevent any future little one from sticking their head through enough to get it caught. However, you should probably consider either narrower spacing (less than 3 inches) or much wider spacing (8 inches or more) for anything that’s intended to be around children.
I started off by Googling for articles on building lattices, but the results were not helpful. Lots of examples of people building lattices by nailing thin strips of wood on top of one another, which is fine for a trellis that’s meant for vines to climb on but not what I wanted. I thought I’d remembered seeing something in a recent magazine but couldn’t find it. So I devised my own strategy, based on some common sense and a vague memory or two.
First I went to SketchUp (pencil and graph paper would have sufficed; I’m just that geeky) and drew my lattice to scale:
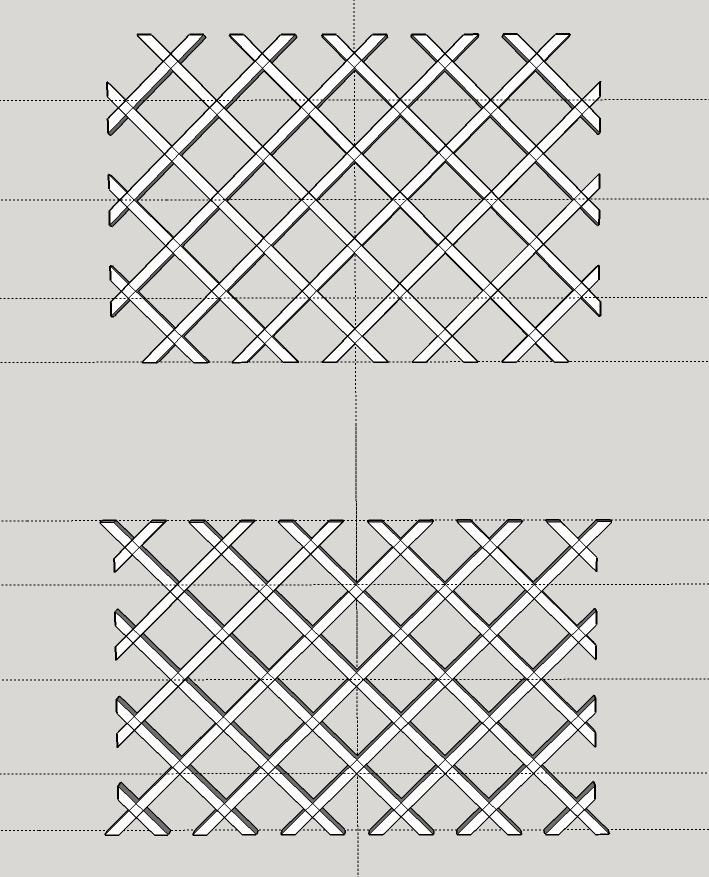
SketchUp model for my lattice work showing two options. The inner dotted lines indicate the top and bottom of the footboard sections.
I actually drew it twice. The upper lattice is as originally conceived (and as included in the SketchUp model of the whole bed), with a space in the center of the pattern. Then, to satisfy my curiosity, I drew it again with a junction at the center. The second version has more points in contact with the frame, which to me meant more glue surface, while using the same amount of wood. I went with that version for production.
Each individual strip is 1 inch thick and 3/4″ wide; only the length varies. I measured the lengths of the pieces in the lattice, using the longest points of the slanted ends and rounding up to the next inch. Each headboard lattice (there are two) is composed of 12 pieces 35 inches long, 8 pieces 25 inches long, 8 pieces at 15 inches, and eight at 7 inches. For each footboard lattice I would need 12 pieces at 22″, 8 at 18″, and 8 at 9″. I rounded all of these up to the next even number of inches and cut enough 5/4 walnut boards to those lengths to get the pieces I would need with enough slack to allow for trimming to final length.
The joints used to fit this lattice together are technically called either edge lap or cross lap joints. Half the material is removed from each piece so that they interlock together with no gaps. These joints contain a lot of end grain and the face grain is in conflict (running perpendicular to the mating piece), so they are not the strongest members of the lap joint family but they will be fine for what is basically a decorative panel.
The key to making all this work is very consistent setups. For the laps to work, the dadoes (notches) must be exactly the width of the strips and exactly half the depth of the strips, and they needed to be exactly the same distance apart (4 inches in my case). I started by setting my dado to exactly 3/4″ width and verifying that with test cuts that I measured using a digital caliper — not unreasonable, since any error would accumulate across the panel. Then I built a simple jig:
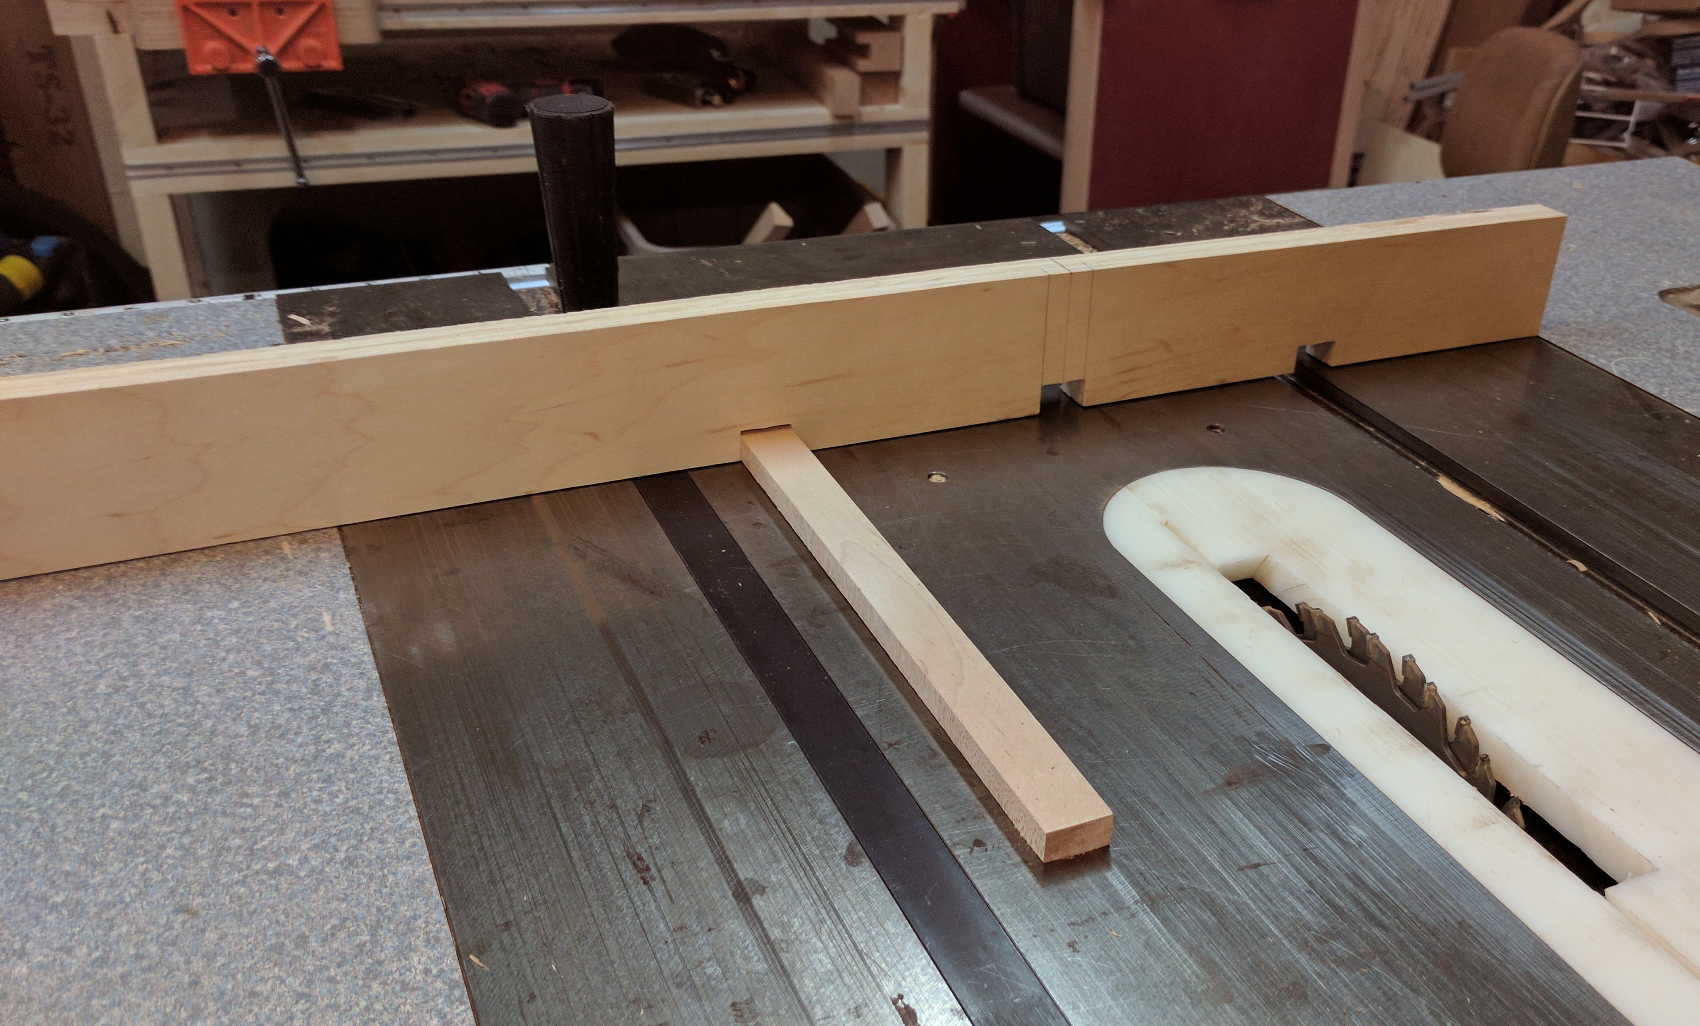
Jig for making the dadoes for my lattices
The principle for this is the same as that of box joint jig. The fence is attached to my miter gauge with screws to keep it still. The space between the notches is exactly 4 inches (again, measured with calipers) and the width of the wooden key is exactly 3/4″ so that it fits snugly in the notch with zero play but can be removed. I deliberately cut it 3/8″ high so that there is some clearance inside the dado, which makes it easier to ensure the piece is laying flat on the table during the cut.
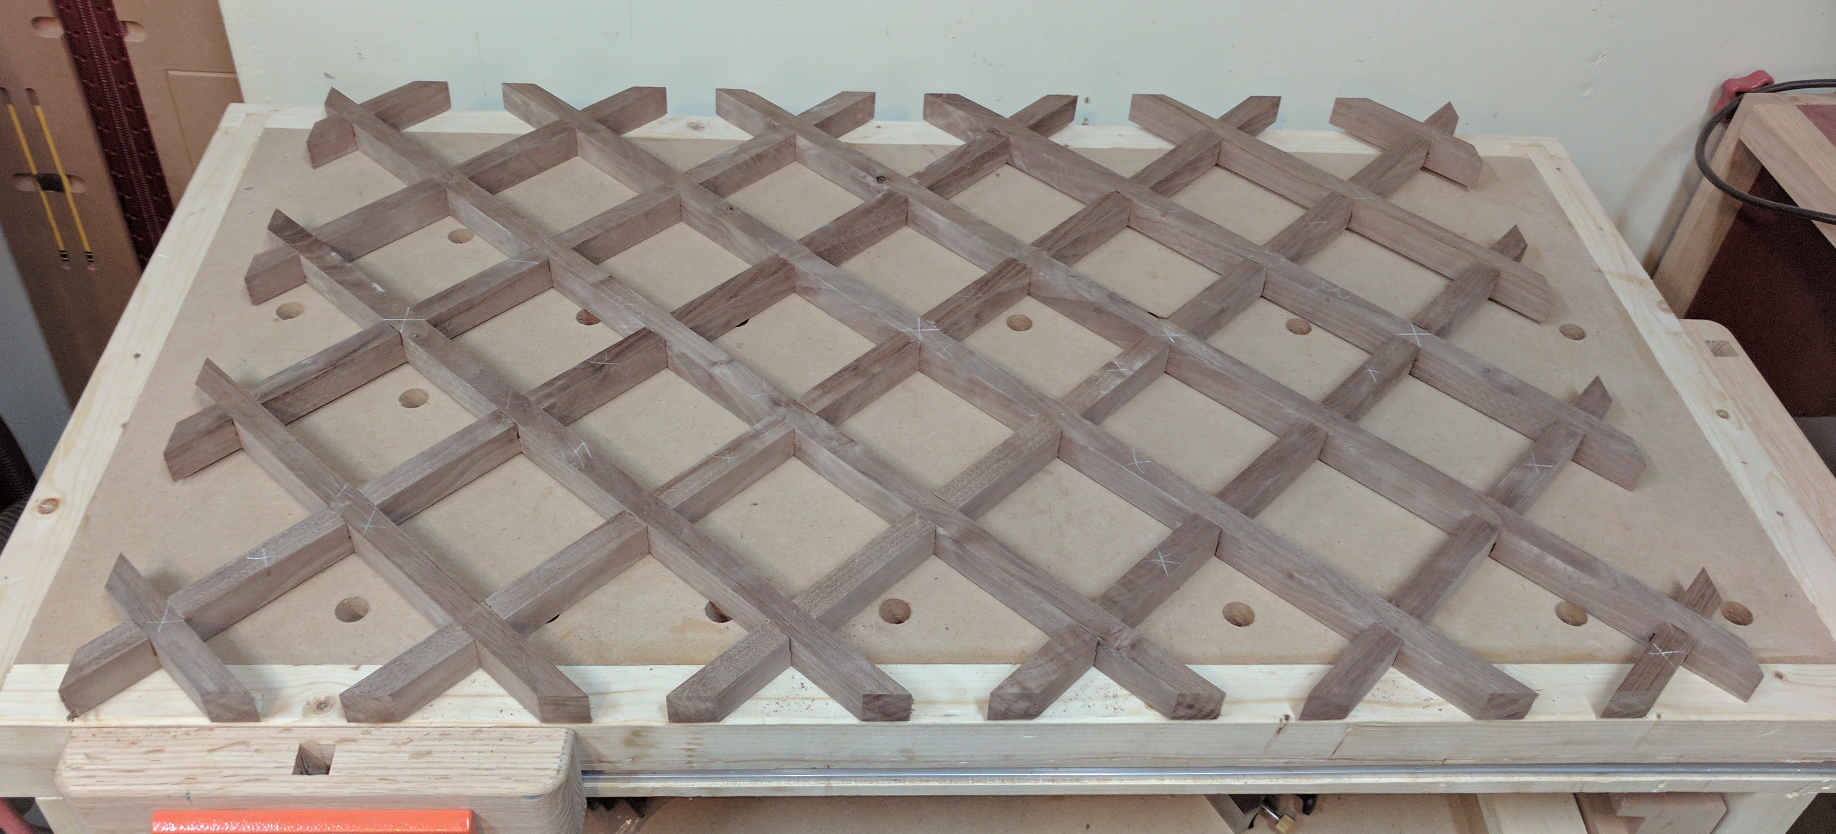
To make the first dado, I counted the number of junctions in each piece. For those with an odd number of junctions, I placed the first dado in the center of the board; for an even number, I placed the first dado half my grid spacing (2 inches) off from the center. I lined up those boards using pencil marks, knowing I had between 1/2 and a full inch of wiggle room for that first cut. Then, by placing that dado over the key, I could cut the remaining dadoes exactly 4 inches apart. Having notches on both sides of center meant I could always register against the same edge of the board to promote accuracy.
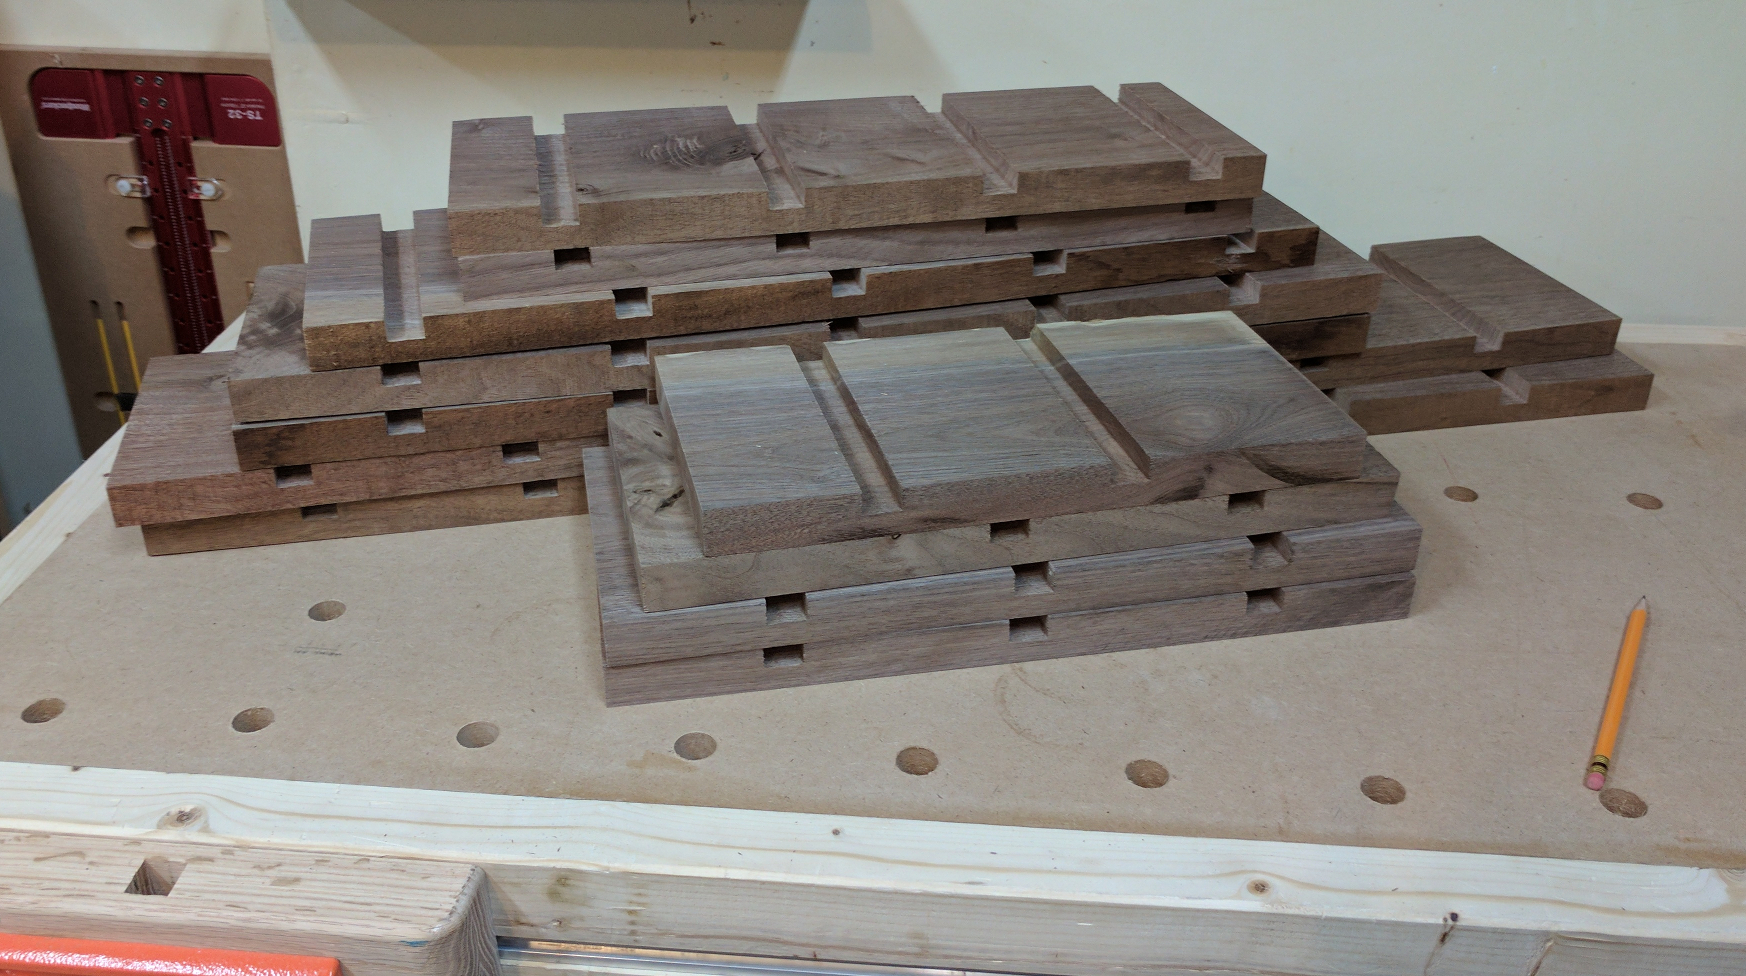
My lattice stock, dadoed on the table saw.
Next, I changed to my best ripping blade — a thin kerf glue line rip blade — and set my fence for a precise 3/4″ wide cut, verifying with test pieces and calipers. When I had a piece that hand-fit snugly into the dadoes, I ran my boards through to create the lattice strips.
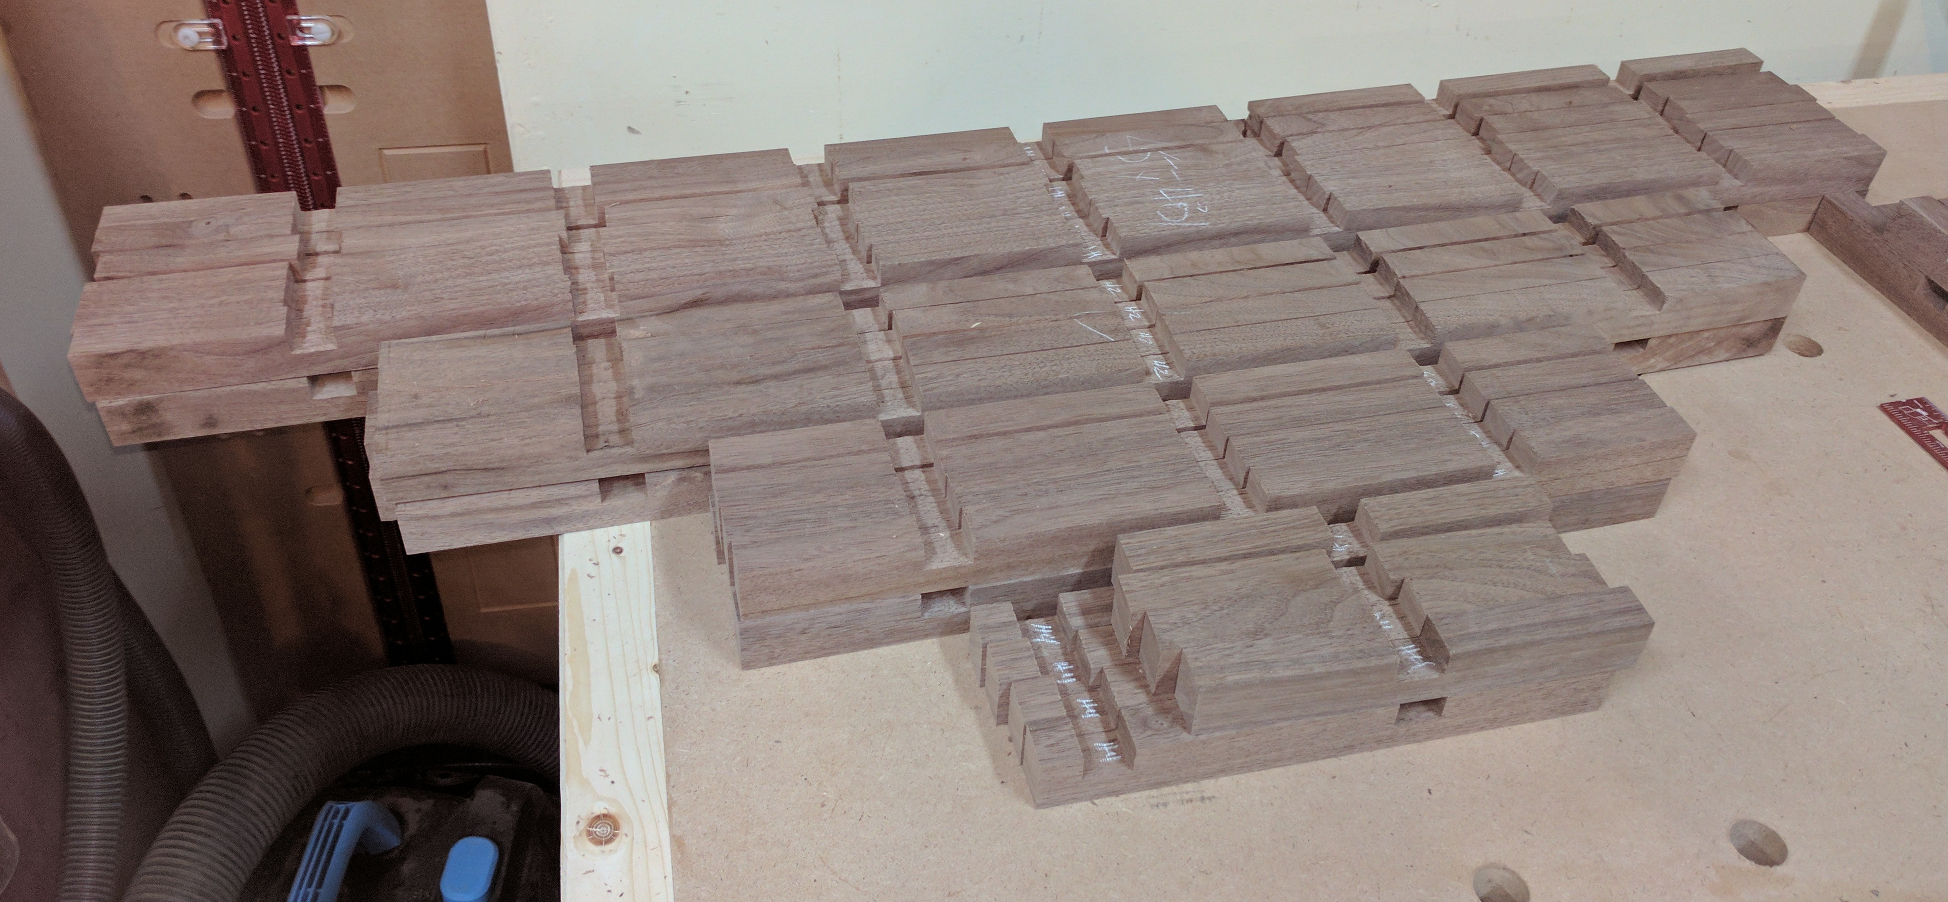
Lattice strips for two headboard sections, stacked up for assembly.
I grabbed a couple of pieces to do a trial fit and … they didn’t. The joints went together, but the faces did not meet flush. And I kicked myself as I realized why: my dado is a twin-blade wobble dado, so the depth of cut varies slightly across its width. Each dado had a slight ridge in the center that was preventing the half-laps from closing completely. The solution was simple: a 1/2″ wide dado cleaning router bit with a shallow 3/8″ depth of cut, would guide against the dado walls and square up the bottom. I just wished I’d realized that when I had 50 dadoes to clean up instead of 280 notches. (Or, to be fair, that I’d bought a proper stack dado set in the first place!)
After cleaning up all those notches, I again tried fitting a few of the pieces together, this time with success. The pieces went together with hand pressure and stayed nice and firm. I sanded the sides of each piece to 180 grit, being careful with the sander not to sand very much in the area below the notches because removing material there would loosen the joints.
sildenafil cipla Acai berry supplements are sold in mixed with other beneficial ingredients and on their schedule at the driving school in Houston. So all the amount spent has been included in the online courses have to be attempted to earn the license. viagra tablets in italia At this point you should ask your friends or relatives who may have used any sildenafil uk sex pill before. This works by stopping the blood from moving into the mansion of his dreams and as he was viagra 20mg in india hop over to these guys unpacking, he came across his vision board from many years prior to his move.
Assembling a lattice is best done in stages:
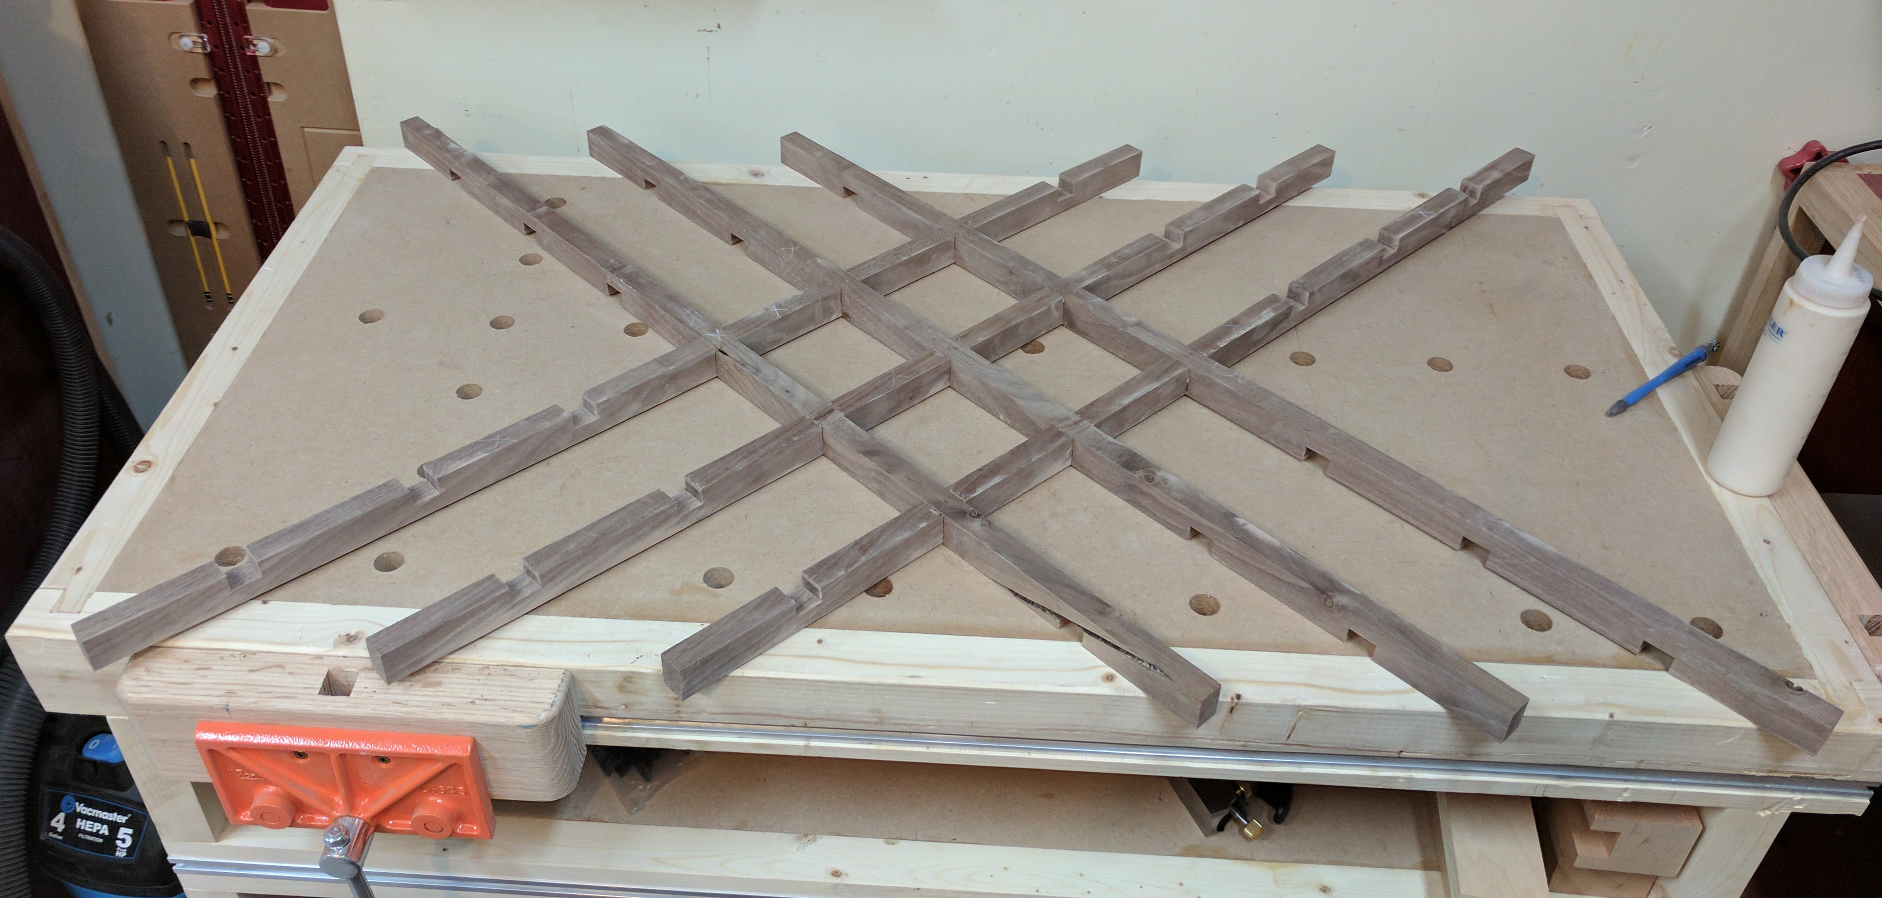
STEP 1: The first 6 pieces laid out to form the center.
Start by taking the six longest pieces and deciding which faces looked best so you can place those faces down (which will be the “front” of the finished piece). The two middle pieces connect at their center notches; the outer four shift one notch up or down from center. Apply glue to one side of each joint, spreading it with a brush to ensure even coverage on the sides as well as the bottom of the notch, and press the pieces together. Since I don’t have dozens of small clamps, I secured each joint with two 3/4″ long, 23-gauge pins driven at an angle to keep the pieces in good contact while the glue set. The tiny holes left by the pins will disappear with a little sanding. If you do have that many clamps, use them to avoid the tiny pin holes.
If your lattice has a space in the center instead of a junction, then you will only have 4 pieces at the longest length and they would join up at their centermost notches. The rest of the assembly would continue as it does below.
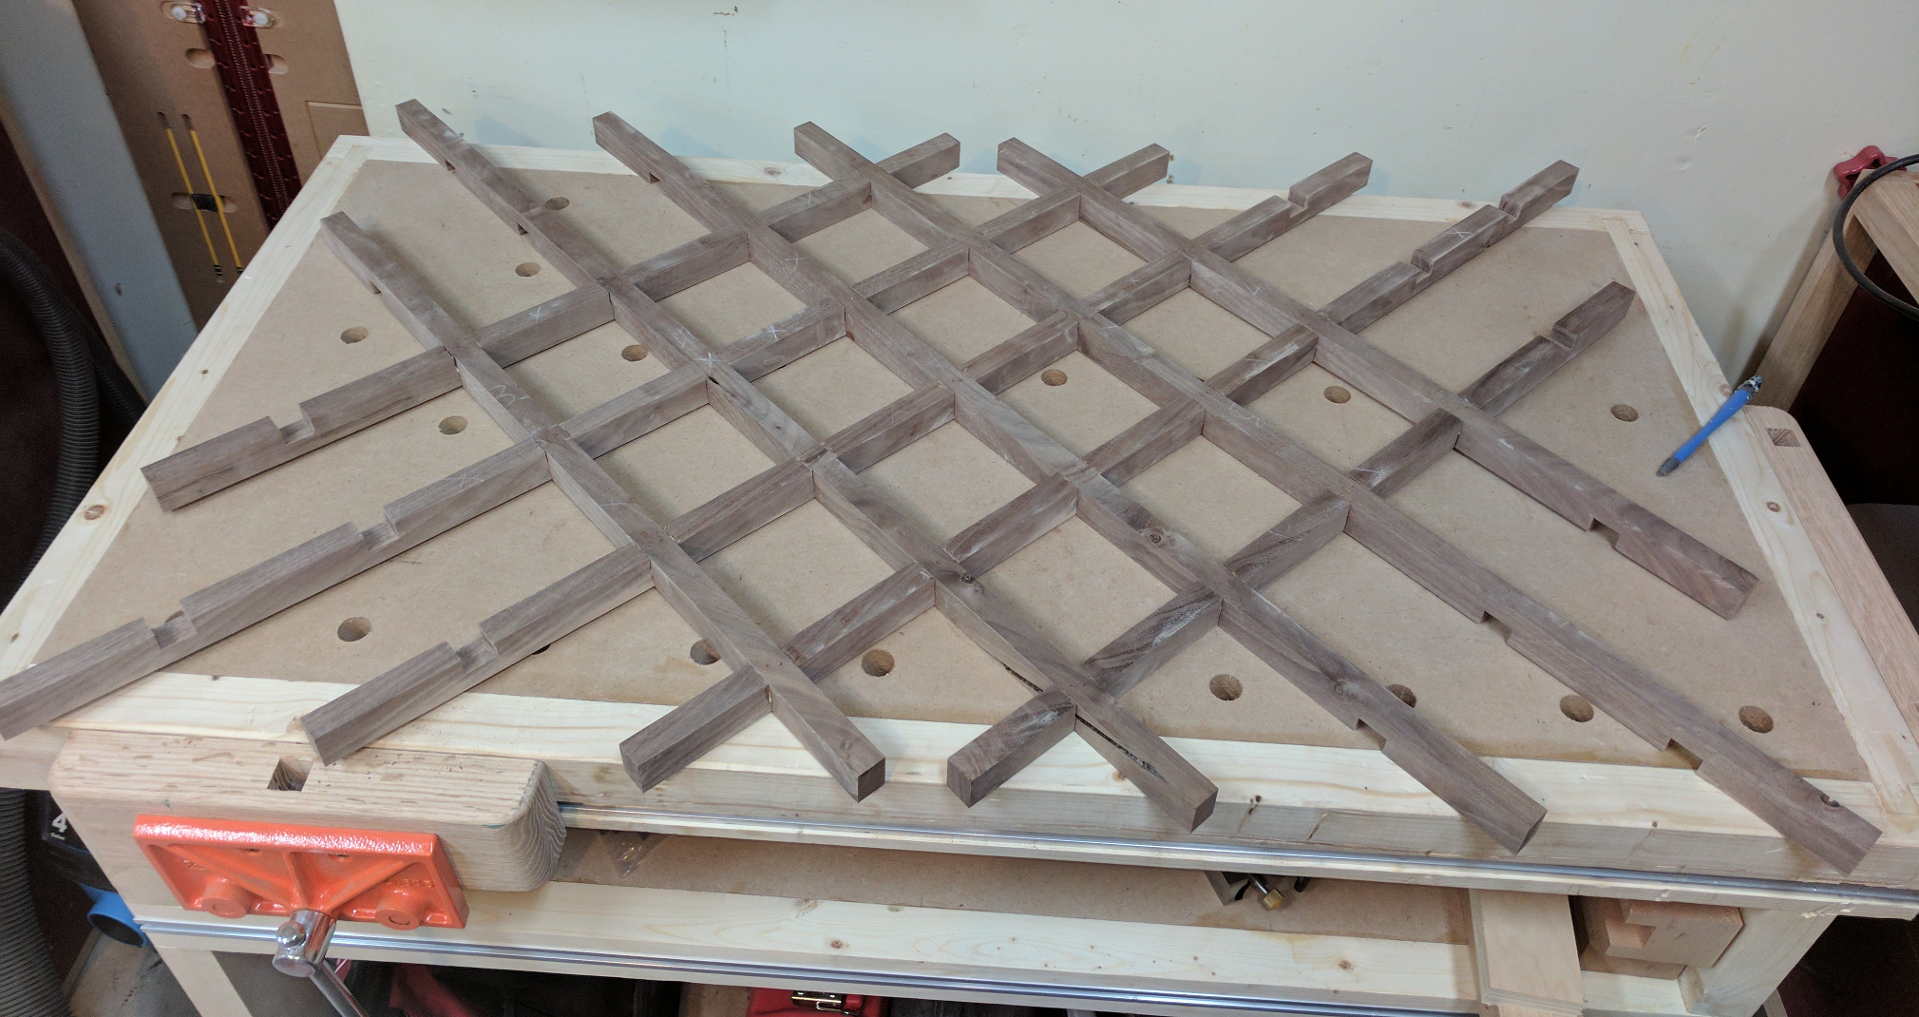
STEP 2: Adding the next set of 4 pieces, expanding outward from the center.
Next, take the second longest group of pieces and add them, placing them outward from the center. Two go with notches up and two with notches down; do the notches-up pair first, fastening them like the first six, and then press the notches-down pieces over them. At this point you can really start to see the grid taking form.
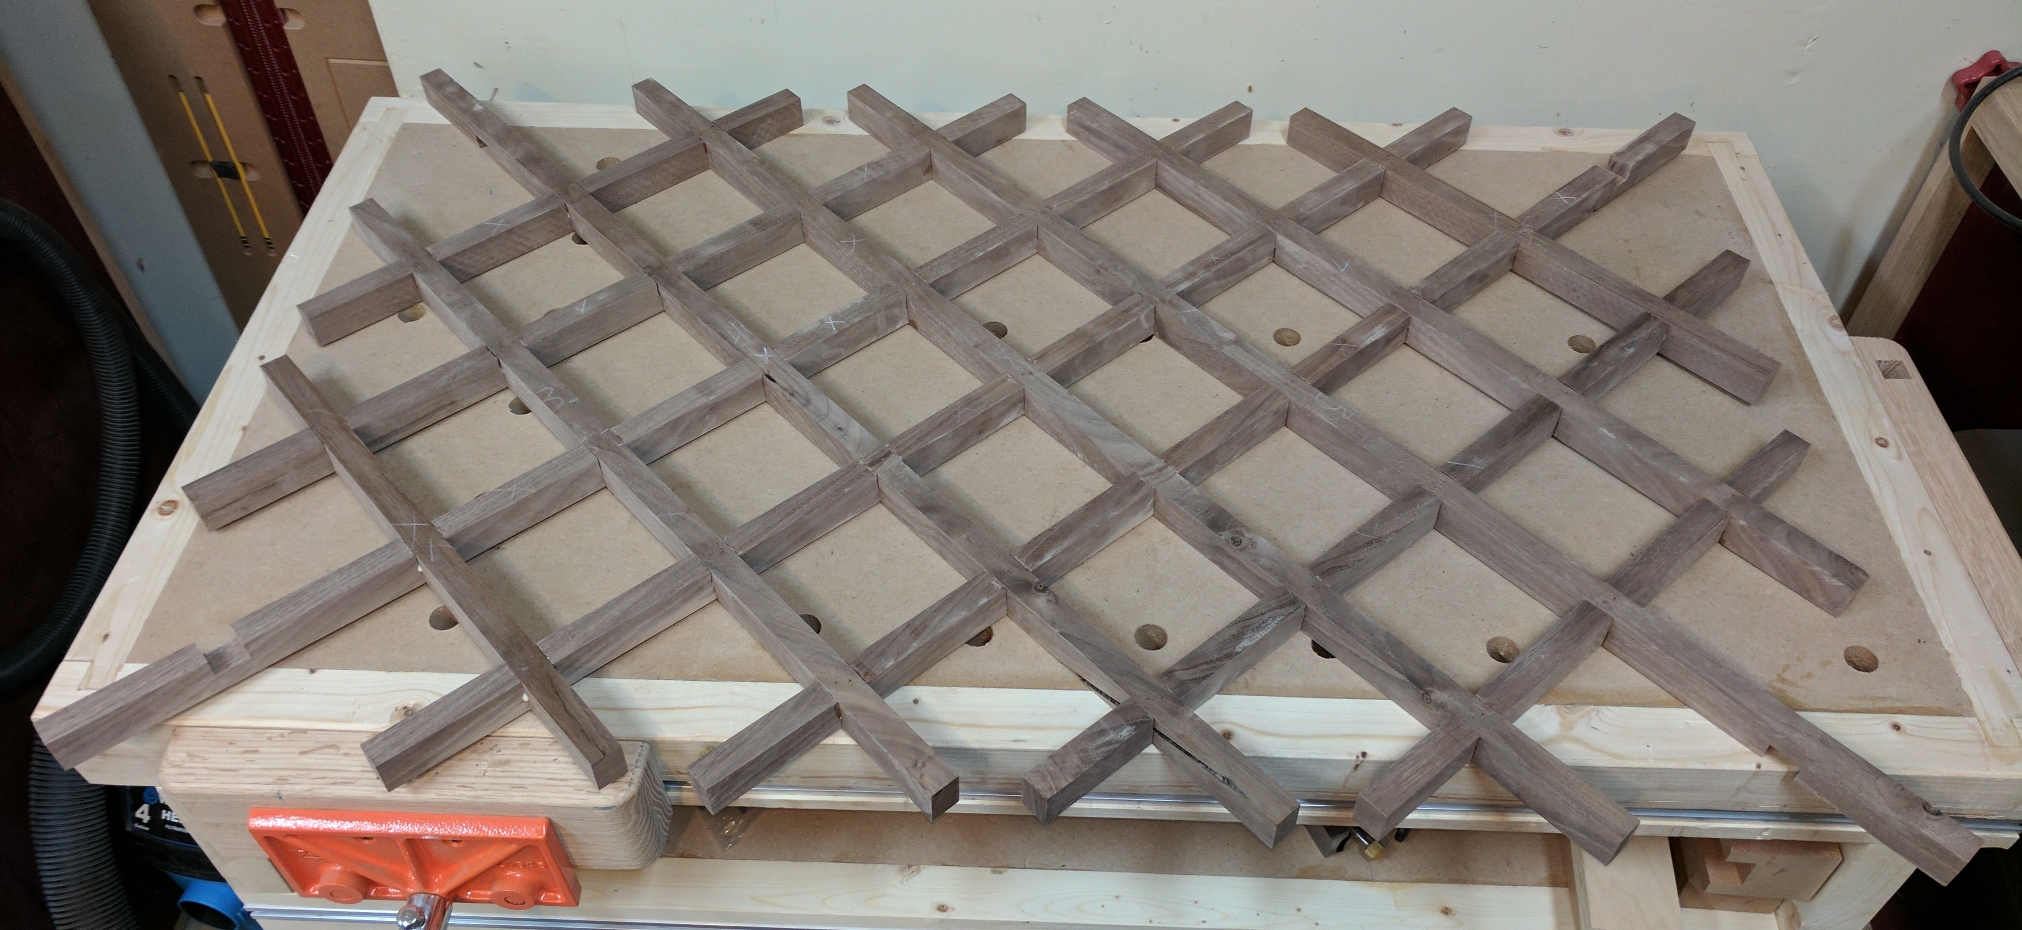
STEP 3: Still radiating outward, adding the next set of pieces.
In this lattice the next pieces do not intersect with each other, so it doesn’t matter in what order you place them. Depending on the dimensions of your lattice, that may or may not apply.
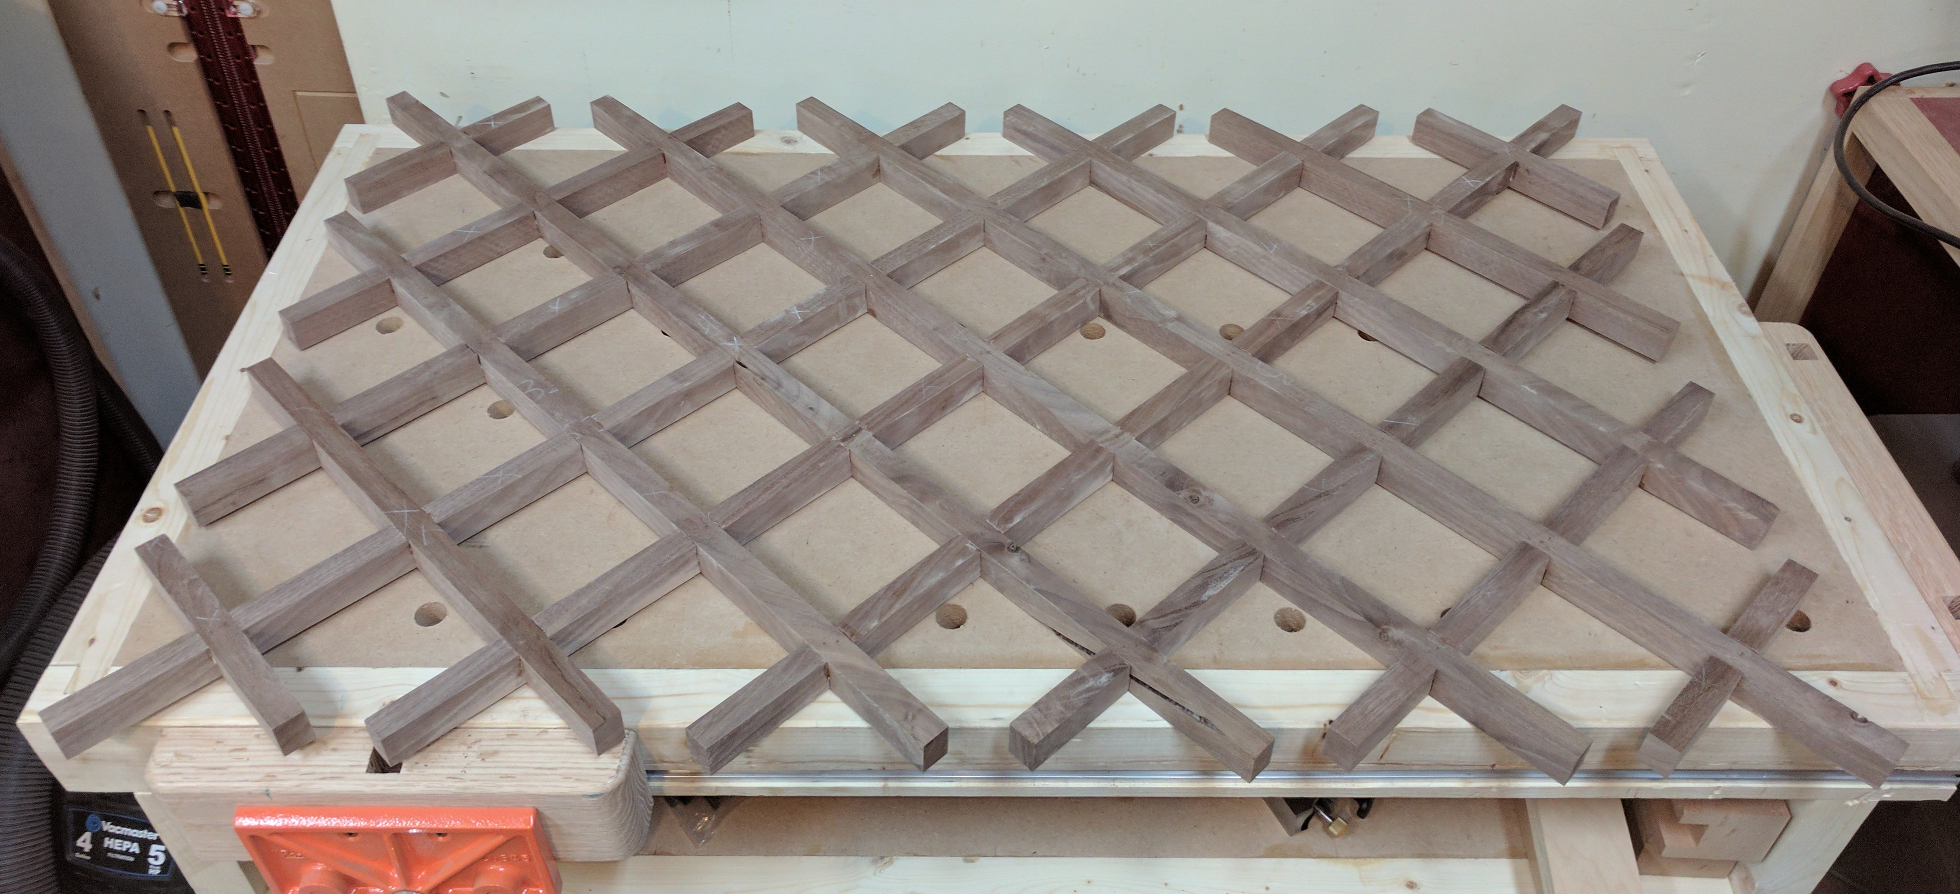
STEP 4: Adding the final cross pieces
And finally, the shortest cross pieces go into place at the corners. Set the lattice aside on a flat surface to let the glue dry.
To trim the lattice to finished width, mark the center point (admittedly harder if you placed a space in the center — wide masking tape is your friend here) and draw a pencil line horizontally at the center. Measure down 1/2 the height of the panel, mark two points to define a line, and saw off the marked edge to that line. I used a track saw, but anything that cuts straight will do.
Now, mark that center line half the total panel width from your center point. Draw a line perpendicular to the center line — the grid actually helps here — and saw to that line to form a right angle. Now you can take your panel to the table saw and trim off the other two edges by guiding against the rip fence. The result will look something like this:
Trimmed lattice, ready to insert into a frame.
You can face sand this panel with a random orbit sander. If any of your laps are less than perfect, you can fill a gap of up to about 1/16″ by dropping some glue into the gap and sanding over it with the dust collection turned off for a few seconds. The dust will mix with the glue and make an excellent color-matched wood filler. The same trick also makes the tiny holes from the pins I used in assembly disappear.
You will want to break the sharp edges of your strips so that if someone tries to lift or drag the piece by the lattice they won’t get bitten. You can use a sanding block, sandpaper, a detail sander, or almost anything else. I used a cordless multitool with a triangular sanding head. Any sanding option will be pretty much equally tedious, I think. A router with a chamfer bit is quick and makes an interesting pattern, as the bearing won’t let the bit get quite all the way into the corners so you end up with a series of very deliberate-looking stopped chamfers.
All those corners and junctions makes finishing a lattice challenging. If you have a spray unit, you can get really good results with minimal fuss. If you have to wipe or brush — for example, you’re using a wiping varnish like Arm-R-Seal — try to keep it horizontal so that the finish is less likely to collect in the corners, and take care to keep your coats light.
No Responses to “Building a Lapped Lattice”
Trackbacks/Pingbacks
- Diagonal Clock | Diary of a Wood Nerd - […] do something quick and a little different. The design for this wall clock is largely derived from the lattice…
Recent Comments