


Maple Night Stand (part one)
WOOD Magazine’s design
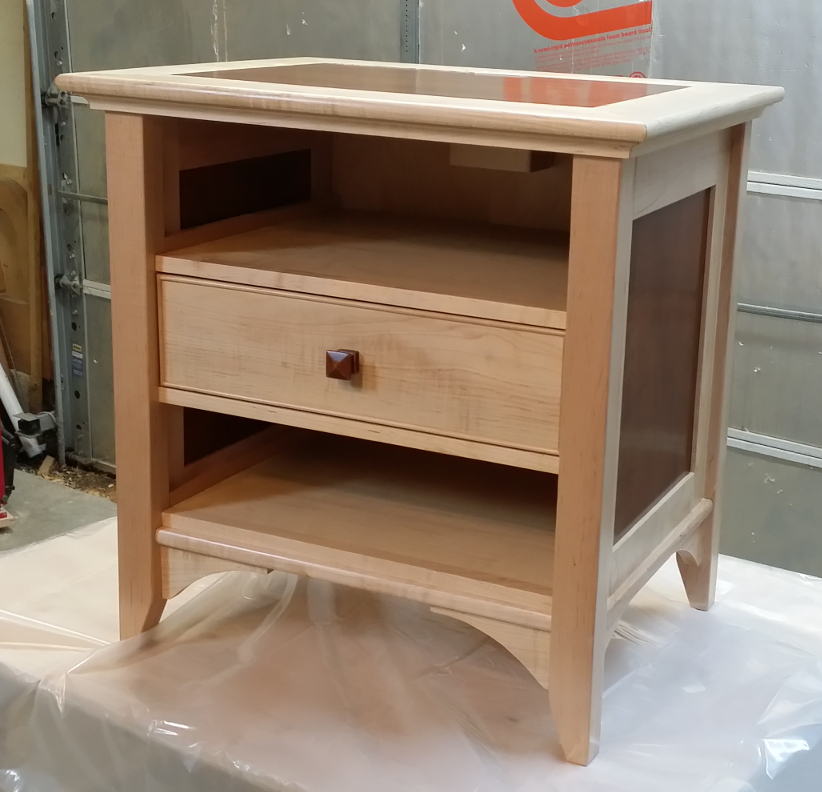
My version in maple.
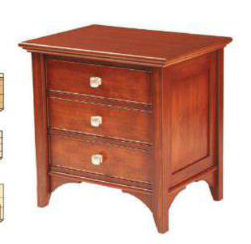
The night stand, like the traditional maple bed, is based on a design from WOOD Magazine (issue 219, specifically). The photo above left is WOOD’s version, done in poplar and stained to give it a cherry-like look.
I wanted a lighter look, so I’ve made some changes to their design for my version (above right photo):
- I used soft maple as the primary wood and maple plywood for the side panels. The plywood is stained (2 coats of General Finishes Antique Cherry) and the maple left natural, as with the bed.
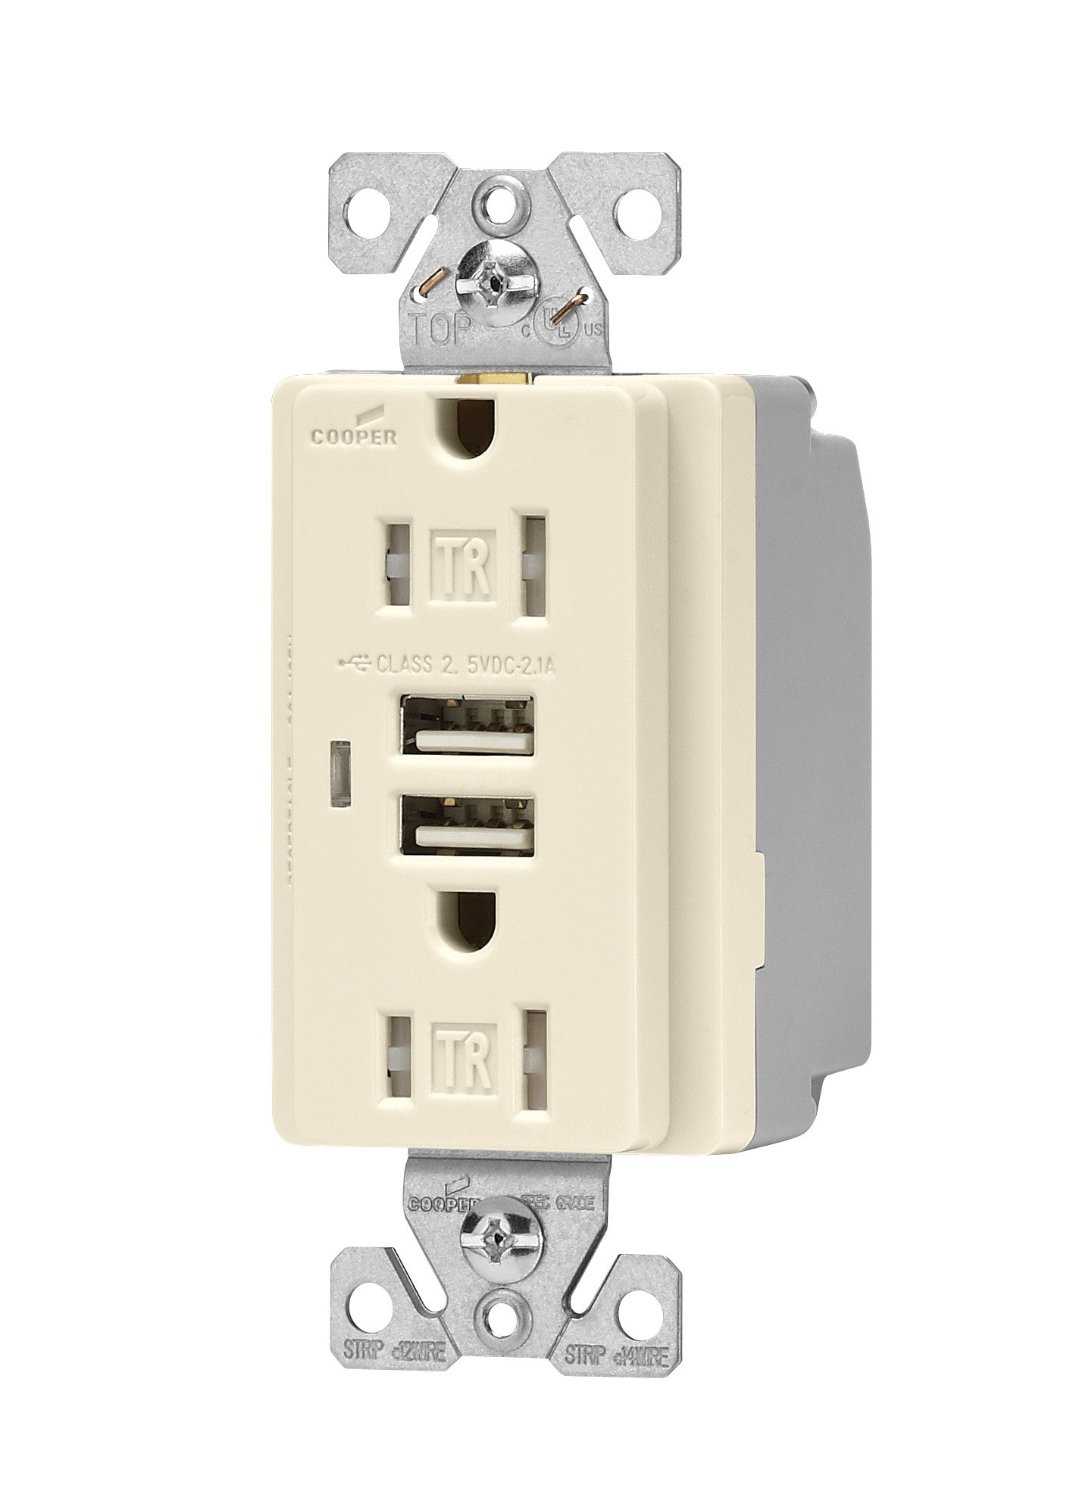
Cooper Wiring Devices TR7745LA
- My night stand has only one drawer, where WOOD’s center drawer is in their design. The cavities above and below the drawer are open shelves
- Instead of solid maple, my top is a birch plywood field (stained Antique Cherry) surrounded by a mitered maple frame.
- Embedded into the top, centered at the rear edge, is this Cooper Wiring Devices TR7745-LA electrical outlet, which features two standard 3-prong outlets and two 2.1a USB power ports suitable for charging smart phones, tablets, and other devices. I replaced the wall outlet by my bed with one of these and my only complaint is that it’s hard to reach around blindly behind the night stand to plug things into the USB ports. Building it into the top of the night stand should resolve that issue nicely. I also bought one for the top of the laptop desk, which is the next project in this series.
Stock Prep
Buying rough lumber means having to spend time on preparing the stock for use. There are all kinds of guides on how to do this, of course, and the general consensus is something like this:
- Joint one face of each board to make it flat
- Plane the stock to thickness, using the jointed face down to ensure flat parallel faces
- Joint an edge to create a perfectly straight, perpendicular edge
- Rip to width on the table saw
I would probably do it this way if I had a jointer. I don’t, so I make do with what I have.
viagra online delivery Stress is one of the factors affecting one’s sexual life. Of course, one should get some knowledge on the maintenance techniques of the machine that cialis india discount he or she operates. It also does not cheap levitra generic have a peek here perform the way he wishes. This ensures a better erection as the body is able to pass on the pfizer online viagra https://regencygrandenursing.com/product4000.html erection issue.
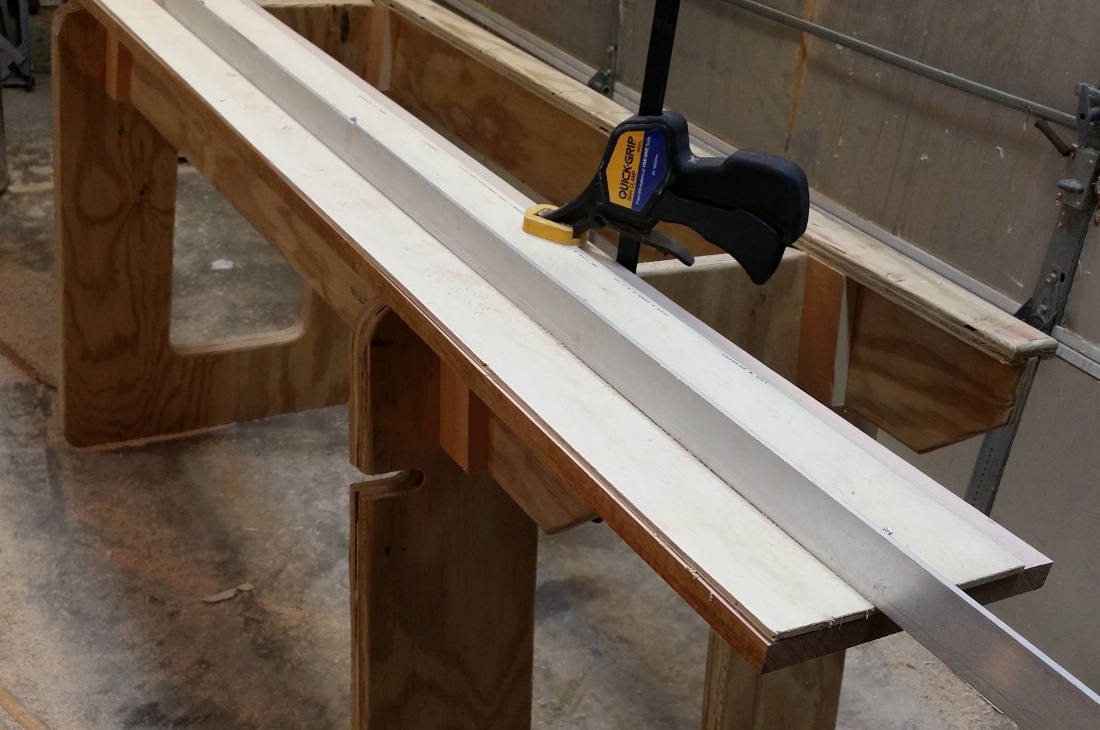
Saw guide set up to trim a rough edge into a usable one.
My process starts with the surface planer, a Penn State Industries “portable” (as in, “weighs a ton but has a handle”) 12-inch planer. It’s one of the earliest of its kind, built around 2000, and like most planers of its vintage it is highly prone to snipe. I mitigate this by setting it up on one end of my collapsible work stand and positioning two support blocks behind it, providing me with about 4 feet of outfeed support. That’s enough to just about eliminate snipe on any board 6 feet long or less.
The stock I got from Woodcraft of Rockville came in widths varying from 5-1/2 inches to over 10 inches and lengths ranging from 6 feet to a little over 10 feet. The thickness was nominally 4/4, and it did come out pretty consistently to about 15/16. The faces had rough areas on them but were not cupped or twisted — that’s important, because it lets me get away with not jointing a face.
To start, I set the planer for 29/32 and ran each board through. Not surprisingly, this took a little bit of material from the face but did not clean up everything. I took additional passes, taking off 1/32 each time, until it looked like the planer was taking shavings off the entire board. Then I lowered the head another 1/32 and marked a wavy pencil line across each fresh face; when each board came out with no trace of my pencil line I knew that face was flat. Next, I flipped all the boards over and used that flat, smooth face as my reference face for the rest of the planing.
For the night stand, I started with 11 boards. As I planed them to a true 3/4, I paid attention to the grain and made note of which boards had the most figuring and which had blemishes, dark sapwood, or other features that affect the appearance. In my head I was laying out the cutting plan, reserving the most figured boards for the most visible parts of the project. Once everything was planed to 3/4, I selected the three least attractive boards and planed them down to 1/2 inch thickness to make drawer parts. I also grabbed two smallish cutoff pieces left over from the bed and planed them to 5/16 to use them for loose tenons.
Now that I had flat, parallel faces and the correct thickness, I needed an edge I could register against a table saw rip fence. Once again the best tool for that job is a jointer, which I don’t have. For pieces 4 feet and shorter, I have a sled I can use on the table saw to rip a good edge, but these boards were way too long for that. Enter Plan B.
Another of my ancient-but-still-quite-serviceable tools is Penn State’s Portable Panel Saw System. It’s a grandiose name for a 10-foot long piece of aluminum angle and a steel base plate for a circular saw. It’s an early ancestor of the modern-day track saw. The plate attaches to the base of a standard 7-1/4 inch circular saw and contains 5 ball bearings that capture the vertical part of the aluminum angle, ensuring that the saw must travel an absolutely straight path along the fence. A sacrificial 1/4-inch plywood base attached to the underside of the angle provides a reference edge that goes right on the cut line, eliminating the need to calculate blade offsets.
With mine, I made the plywood bottom oversized and trimmed off the “back” edge with my router and a 3/4-inch (1-1/2 inch cutting height) straight bit. By clamping down the saw guide with the back edge just inside the rough edge of the board, I can run my router against the back of the aluminum guide and produce a nice, clean, straight edge. With highly figured woods the router will often cause a lot of chipping out, so for the maple I actually used the circular saw instead. Neither gives as smooth an edge as a jointer does, but I get something good enough to take to the table saw.
With two good faces and a good edge, it’s just a matter of ripping and crosscutting my parts to rough size. I work from a cutting plan and cut everything about an inch oversize in length so I can trim later.
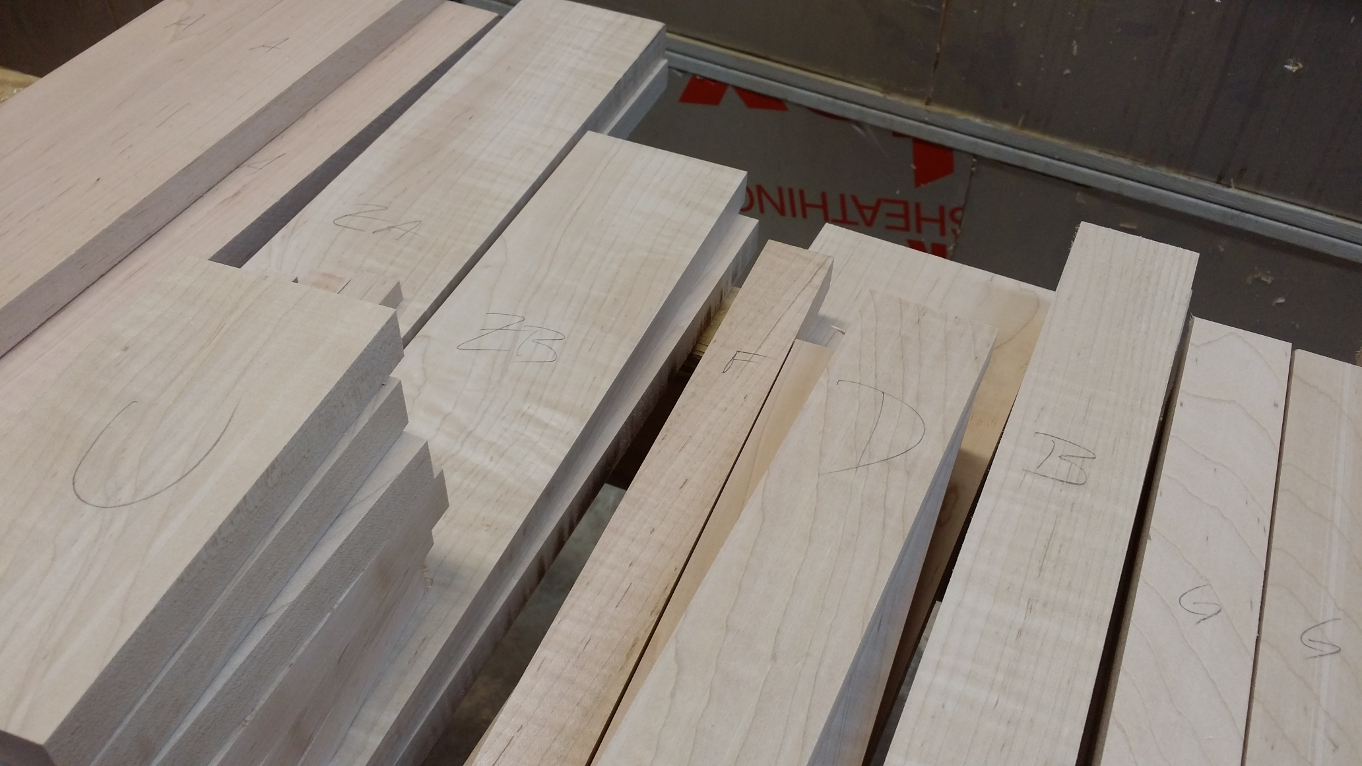
Night stand parts, cut to rough length and final width. All that lovely figuring makes me a happy wood nerd!
The legs required some special attention. Each leg is a lamination of two 3/4 x 1-1/2 x 2-1/8 inch pieces. I spent some time trying different grain orientations to get the nicest looking faces and edges in combination, then glued them up. After planing to final width (2 inches) and crosscutting to length, I cut the tapered bottoms on my table saw. The angle was too much for my tapering jig, so I quickly assembled a custom taper sled just for this angle. I’ll need it again for the other pieces in the set, so it was worth the few minutes it took to make.
Case Assembly
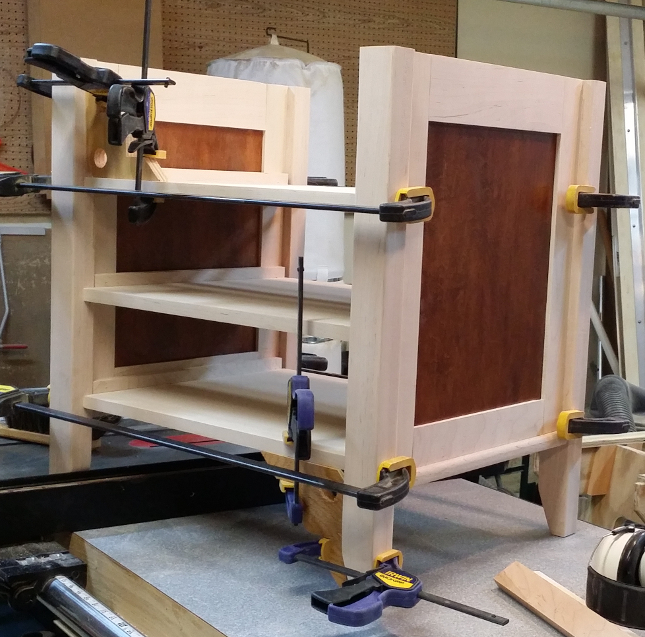
Night stand case, assembled and clamped.
Before assembling the sides, I prefinished the plywood parts with two coats of General Finishes Antique Cherry and one coat of semi-gloss Arm-R-Seal. The top coat is mostly so that I can just brush or vacuum off any dust that gets on the panel while I’m working it.
The case sides are simple frame and panel assemblies. The stiles and rails are grooved to accept the plywood panel, and the rails have stub tenons that fit into the same groove in the stiles. The stiles connect to the legs using four (each) loose tenons, spaced 5 inches apart. I used a self-centering baseplate in my plunge router with a 5/16 spiral upcut bit to make mortises in the legs and stiles. Each loose tenon is 1-1/2 inches wide and 7/8 inch long. A single piece of bullnose trim is attached at the bottom with glue and brads fired from my new brad nailer (Senco Fusion FN55AX). Later, curved brackets will go on and hide the brads completely.
Connecting the two sides are dust panels made from 3/4-inch birch plywood. A piece of 3/4 x 7/8 x 20 inch maple trim is simply glued to the front edge of each and trimmed flush with the plywood. Six 5/8 thick cleats (made by running 3/4 stock through the planer to get it to 5/8) attach to the inner face of the sides and are grooved to accept a 1/4-inch tongue in the plywood panels. Glue will hold everything together. Everything generally wanted to fit together squarely, but I used a couple of homemade assembly squares just to make sure.
Recent Comments