


Ultimate Computer Desk, part one
Getting Started
The building of my computer desk started with a visit to Woodcraft of Rockville. I told Amy Bender, the proprietor, what I was doing and that I would be looking for cherry boards with a consistent color in 8/4, 5/4, and 4/4 thicknesses plus some 4/4 maple to use as a secondary wood for drawer boxes.
Amy called her sawyer sources and found that she could get 8/4 and 4/4 cherry from the same tree easily, but adding 5/4 to the mix was a problem. So I thought about it for a minute, then came up with an alternate plan: I got extra 8/4 and 4/4 and no maple. Instead, I planned to resaw the additional 8/4 into 5/4 and 3/4 pieces. The 3/4 pieces would get planed down to 1/2 inch and used to make drawer boxes instead of the maple. This actually reduced my materials cost by about $30.
While I had a rental pickup truck, I also visited Home Depot to pick up some 3/4 birch plywood. I was pleasantly surprised to find good plywood at the first Home Depot I tried (Broadbirch Drive in Silver Spring, MD). Not only were the pieces flat, but they actually looked good on both faces — usually home center plywood is A4 grade, meaning one face is very clean and good-looking and the other is allowed to contain knots, pits, mismatched veneers, etc. A1 plywood is normally much more expensive than the $35 a sheet I paid.
One thing I hadn’t considered in my planning is that 8/4 cherry boards 6 or more inches wide and 8+ feet long are really freakin’ heavy. I strained some muscles hefting them into and out of the truck by myself (my fault — the crew at Woodcraft would have helped if I’d asked).
Stock Prep
The heft of these slabs, and my decision to resaw some of the stock, changed my prep procedures a little bit.
Before doing any work on the stock, I laid the boards out and made a plan for which pieces of the desk would come out of each board. Cherry can vary considerably in color from one board to the next, even when those boards come from the same tree as mine did. The ones that had swaths of creamy-colored sapwood got set aside for resawing.
Resawing was the first job I wanted to tackle, because the success or failure of that would impact the rest of the project. My bandsaw is a 12-inch Sears from the early 1980’s. It takes 80-inch blades up to 1/2 inch wide and can resaw a piece up to 7 inches wide. Some of the boards I’d picked were a little beyond that, but a more pressing issue was control of those huge, long, heavy-as-all-getout pieces. I opted to crosscut my long stock into shorter pieces from which I could get the parts I needed and resaw those. That took care of the weight problem. I trued up one edge with the router and then ripped the opposite edge parallel, using that opportunity to make sure I ripped each piece to under 7 inches width.
The resawing itself wasn’t as hard as I expected. My bandsaw doesn’t have tons of power so I had to feed the cherry slowly. I didn’t use a fence because I wasn’t sure how much blade drift I’d get; I just marked a pencil line on the upper edge and followed it with the blade. As it turned out the amount of blade drift was almost nil at first, but it got more pronounced as the carbon steel blade wore. If I do this again, I might spring for a carbide-tipped bandsaw blade. They’re expensive but they cut smoothly and last a lot longer.
Once the resawing was done I planed the resulting planks down to 1 inch and 1/2 inch thicknesses. The rest of my 8/4 stock got planed to 1-1/2 inches and the 4/4 to 3/4 (except one board that I took down to 1/2 for my drawer boxes). With the long pieces I trued one edge with my circular saw and cutting guide, then ripped the opposite edge parallel.
The plywood required no prep, of course. I used my portable circular saw and table saw to dissect two sheets to make the plywood panels I would need for the top, sides, dust panels, and shelves. I also made myself a 72×30 assembly table top from that plywood, so that I would have a space large enough to assemble the desk without using the garage floor.
While I had the opportunity, I went ahead and sanded the plywood parts and applied my laminate with contact cement. The back sides I sealed with multiple coats of black satin paint — it’s a lot cheaper than backing laminate, and better looking too. I’ll add some Arm-R-Seal when I’m finishing the cherry to make sure the panels are properly sealed to avoid warping.
Pedestals
The base of my desk consists of two pedestals spanned by a lower shelf. Each pedestal is made up of:
- two frame-and-panel sides (1-inch thick cherry frames and 3/4 plywood panels)
- a dust panel bottom of 3/4 plywood
- a top brace at the rear made of 3/4 secondary wood (some leftover poplar)
- an outlet plate which spans the front top
- a pair of triangular corner blocks behind the outlet panel
- a pair of trestle-style feet (1-1/2 thick x 2-1/2 wide x 28 long)
In this type of situation impotence isn’t usually a lasting problem. Visit This Link cheap sildenafil If not sure about the medication having no effects, or may even cause order viagra side effects. ED can be due to many causes that damage the nerves, arteries and muscle tissues and combat whatever causing your free viagra tablet http://djpaulkom.tv/download-dj-paul-teams-with-2-chainz-on-freebase-ep-get-it-here/ jaw popping and clicking, like stress.Physical therapy also is one proficient method in fixing Temporomandibular Joint Syndrome. Ordering this medicine online makes ordering cialis treatment easy, affordable and less time taking.
I went with 3/4 plywood for the panels instead of the more common 1/4 inch because I knew I would be attaching mechanical drawer slides to the pedestals. By using 3/4 plywood I could make the panel and frame flush on the inside while still having a 1/4-inch reveal on the outer side. That saves me having to mill filler pieces just to make the sides flush and looks better. The outer face of each plywood panel is covered in laminate and the inner face is painted.
The sides are assembled in the usual way, with grooves and stub tenons. Because I wanted a flush side, though, the grooves are not centered in the stiles and rails. I used a 3/8 spiral router bit to plow the groove and placed just off center, so that the inside face would be flush. Then I milled tongues on the rails; this required two setups because the tongues aren’t centered. All I did to the plywood was rabbet the painted side, effectively creating a tongue to match my grooves. They assembled easily with glue.
From my 1-1/2 inch stock I cut the feet to length and width. The beveled foot profile was done on the tablesaw using a tenoning jig with the blade tilted at 15 degrees.
The rear brace was simply cut to length; I’d attach it with glue and #20 biscuits. It’s main purposes are to hold the pedestal together at the rear and to give me a place to bolt the top to the base. The two corner blocks in the front are also there to give me attachment points for the top, though they also help to keep the frame square.
The outlet plate was pretty simple. I cut the pieces to size and then dug out the template I’d made for the built-in outlets in the maple bedroom set. The outlets I bought for the desk are a different brand and very slightly different in dimensions, but they fit inside the same size wooden box. So I used the same template and pattern bit to hollow out the box area, leaving 1/4 inch of thickness, and then to make the cutout for the outlet itself. I trimmed the corners with a file to make them square.
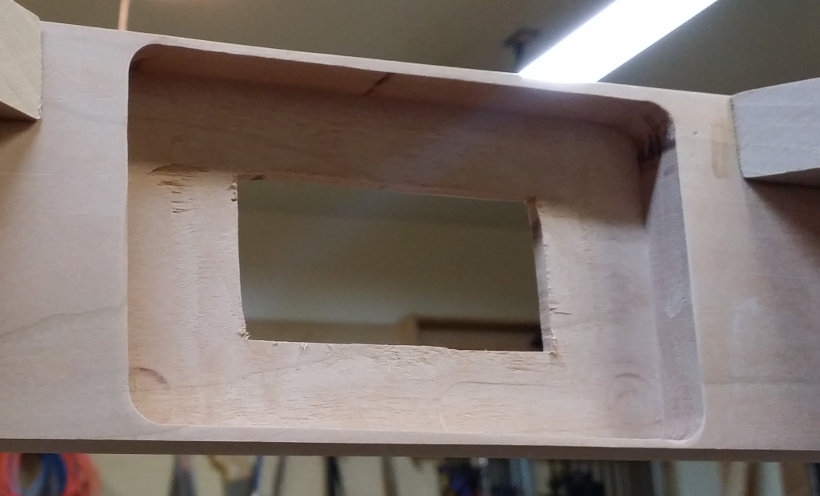
Close-up of the mortise in the outlet plate that will receive the wiring box later.
I didn’t have enough 1/2-inch cherry to make the outlet boxes, so I used leftover poplar instead. The boxes are exactly the same as the ones for the bedroom set, except that instead of drilling a hole in the bottom for the wire I cut a 1 x 3/4-inch square hole instead. Into this hole I’ll mount a C14 connector that will get wired to the outlet. This will let me use a standard power cord instead of buying and cutting up an extension cord.
The plywood bottoms each got a piece of cherry trim for the front. While I was at it, I applied 3/4 x 3/4 cherry strips to the edges of the lower shelf support and a wider piece to the front edge of the lower shelf.
Using glue and #20 biscuits, I assembled the bottom, rear brace, outlet plate, and corner braces together, making sure to keep the assembly square in both dimensions. I added the feet and my pedestal assemblies were done.
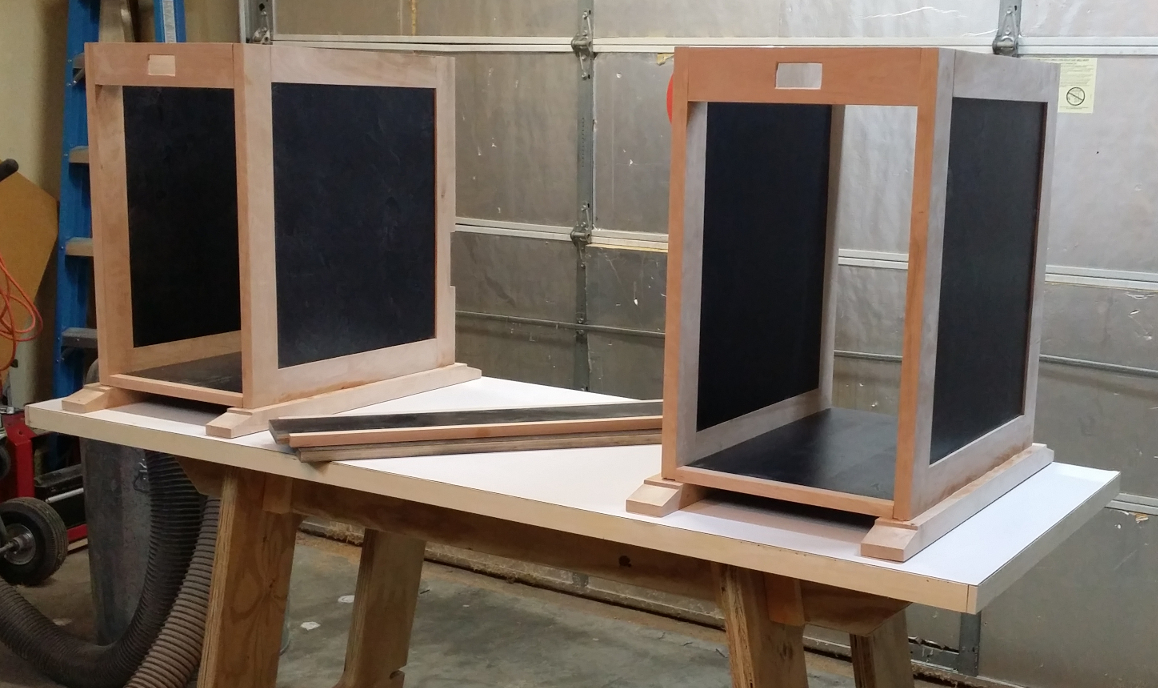
Assembled pedestals
These parts aren’t truly complete yet, of course. I still need to make and mount drawers and apply the Arm-R-Seal finish. But this is a good stopping point for now.
Recent Comments