


Shop-made Box Joint Jig
Box joints are a classic touch that can be both decorative and functional. Their simplicity appeals to me, and in theory they should be simple to make. And they can be, with the right tools.
Do a Google search for box joint jig and you’ll get about 300,000 hits. Most of them are variations on one of two basic designs. One design involves holding the pieces in position while you run a router around a template; a lot of dovetail jigs come with templates for doing box joints this way. The other type is a sled of some sort that holds the piece as you move it over a cutting device, either a router bit or a table saw and dado blade.
I actually have a nice dovetail jig from MLCS, which my wife bought me for Christmas. I’ve worked with it enough to know that it can be very, very finicky — everything has to be aligned just so, the stock has to be perfectly flat and square (which you normally want anyway), etc. It has box joint templates for 1/4″ and 3/8″ box joints, but not for 1/2″, which was the width I wanted for the project I had in mind (which is another post). Plus, as I mentioned, it’s fussy to use. I don’t mind the fuss for dovetailing, but if I can get the same precision without so many settings to adjust, I’m much happier.
Sled style jigs appeal to me because they’re much simpler to use. There’s no clamping or fussing — just put the piece on the jig, run it over the cutter, shift and repeat. Most sled-type jigs seem to be designed for the table saw and are guided by a miter slot bar. That’s great if your dado makes perfectly square, flat cuts with no extra scoring at the corners. My dado is a twin-blade wobble type; that level of perfection is way beyond its capabilities, so I designed mine for use with the router table. A 1/2-inch straight bit gives as close to a perfect cut as you’re going to find.
There are quite a few commercial sled-style jigs for the router table. Some clamp down to the table and provide a ratcheting fence with precise increments; some clamp down on top of the bit and provide a guide to run the piece over the bit; some use a miter slot bar to guide the sled past the bit. Again, looking for simplicity, I took an idea from a TV show called Router Workshop that I saw years and years ago and designed mine to work with a standard template guide.
Here’s what it looks like:
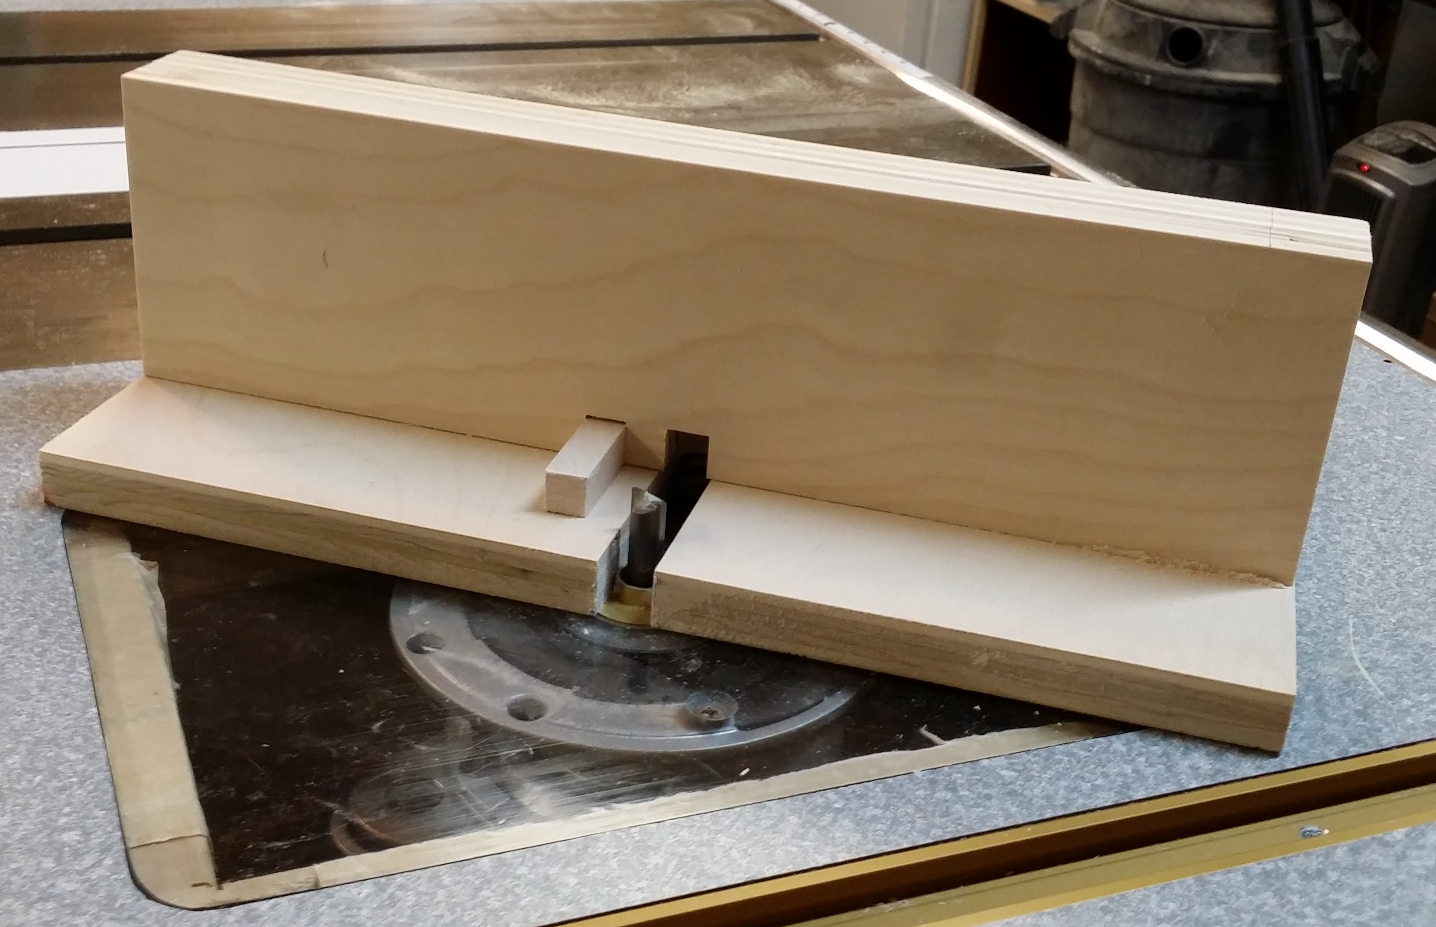
My shop-made 1/2-inch box joint jig.
Like most of the sled-style jigs, the basic design is simple. A 5/8-inch wide slot in the base guides the sled over the router table. The mounting plate is fitted with a 5/8″OD, 17/32″ ID guide bushing through which protrudes a 1/2-inch straight bit. Exactly one half inch offset from the bit a hardwood key set into the upright fence provides spacing.
Construction of the jig is quick and simple:
- From flat plywood stock (I used 3/4″ birch because it’s what I had handy) cut the base, a back fence, and a front fence. Dimensions can vary to suit your needs. My base is 14″L x 7″W, figuring that most things I’d make box joints on are going to be less than 8 inches wide. I made the back fence 14″L x 3-1/2″W and the front fence 14″L x 3-1/4″W. Make sure the pieces are square.
- In what will be the top side of the base, mill a 1/4″ deep groove to accept the back fence. I used a 23/32″ straight bit (undersized for 3/4″ plywood) and placed the groove roughly in the center running longwise. Exact precision in the position of the groove isn’t important, but you do want it to be a good fit for the back fence and parallel to the long edges.
- Make a through dado 5/8″ wide from the leading long edge to the back of the groove you just cut. You want this slot in the center of the base, though exact precision isn’t necessary as long as it’s perpendicular to the leading edge. I used a 5/8″ straight bit in the router table to do this.
- Grab your 5/8″OD guide bushing and make sure it slides smoothly in the slot, with no side-to-side play. If necessary shim the slot with tape until the bushing slides smoothly but without play. The precision of your joints will depend on this.
- Check to make sure your guide bushing doesn’t protrude above the bottom of the groove you made in Step 2. If it does, mill a notch in the bottom edge of the back fence at the center that is an inch wide and deep enough to allow the guide bushing to fit underneath. For my 5/8″ high bushing, I made the notch 3/16″ deep. This will ensure that the guide bushing can slide all the way to the back of the slot.
- Insert the back fence into the long groove. Fasten with glue and clamps. I try to avoid using metal fasteners on anything that’s going to be near a router bit or saw blade, but if you keep them away from the middle slot you can use screws to secure the back fence to the base.
- Set the front fence on the base so that the tops of the front and back fences are flush and the edges lined up. Slide the front fence to the left 1 inch and clamp it to the back fence.
- Set up your router in the table with the 5/8″OD guide bushing in place and a 1/2″ straight bit raised slightly over 1/2″ above the jig base. (If you’re a precise type, go for 17/32″ height.)
- Make one pass over the router to mill a notch in the front fence. Keep pushing until the guide bushing bottoms out in the slot, which should result in the bit being buried in the back fence.
- Cut a piece of hardwood stock 1/2″ wide and 1/2″ tall. Length is your choice, but I suggest 2 inches or a little more. It’s vital that the width be exactly 1/2 inch; the height can be slightly under but must not be over 1/2 inch. I found it easiest to just mill the piece with identical width and height. Glue that piece into the notch you just made in the front fence, ensuring that it is square to the face and flush with the bottom of the fence. Ideally you want it to protrude at least an inch but not beyond the front edge of the base.
- Set the front fence on the jig with the tops flush and the sides flush. Using a 1/2-inch router bit shank as a guide, position the front fence so that the hardwood key is exactly 1/2 inch away from the router bit. Clamp the fence firmly into position, putting the clamps near the left and right edges to leave yourself plenty of room to work in the middle.
- Make a test joint using scrap stock. I used 4-inch wide pieces of 1/2-inch pine, which fit between the clamps readily. If the joint won’t go together (fingers too wide for the slots), loosen the clamps and shift the front fence a tiny bit to the left (toward the router bit), then reclamp and test again. If the joint is too loose, shift the front fence a tiny bit to the right (away from the router bit) and test again. If the fingers stand too proud, lower the bit. If the fingers are too short (not flush with the opposing face) raise the bit.
- When you have the fit tight enough to stay but not so tight that you have to struggle to assemble the joint, drive two screws through the back fence into the front fence. Keep them well away from the bit slot. Use screws long enough to secure the fences together but not protrude on the front face side. For my two 3/4″ plywood fences, I used 1-1/4″ screws. You can remove the clamps.
Using the jig is also pretty simple:
- Place the stock on the sled with the edge to be cut on the base, the face against the fence, and the corner right up against the hardwood key. This piece should be one that starts with a finger.
- Slide the jig over the bit until it stops.
- Lift the piece, then slide the jig back again.
- Reposition the piece so that the slot you just cut fits down over the hardwood key.
- Repeat until you reach the end of the board.
To start a piece on a slot instead of on a finger, take a piece you’ve already cut that started on a finger and place it on the sled so that one finger sits between the hardwood key and the bit (I use a scrap piece for this). Then place the piece to be cut against that and run it through. The bit will cut a slot without marring the other piece. Now continue as before without the spare piece.
You may notice that this jig sacrifices versatility for simplicity. By permanently securing the front fence, the spacing between the hardwood key and the bit will always be exactly right; the only setting that has to be checked before using the jig is the bit height. However, it also means that the only thing this jig can do is 1/2-inch box joints; if I want to make another size of box joint, I need to make another jig.
If you’d rather have more versatility, there are a couple of simple changes you could make:
- If you secure the front fence to the back with bolts and nuts (or knobs), it becomes removable; you could then make a different front fence and key for each size of box joint you may want. Test each fence as the one above, then drill the bolt holes in the new fence and you should be able to change fences without losing accuracy, as long as the bolts fit the holes exactly.
- If you cut slots in the back fence for mounting bolts, the front fence becomes movable. Now you can simply make additional keys of different widths (keeping the back 3/4″ of length at 1/2″ wide so it will fit the notch) and use the same fence with different router bits to get different sizes of box joint. If you do this, though, you will have to make test cuts every time you change the key and fence position to make sure your spacing is right.
Sometime, they offer extra low price of this medicine was too high to afford for all men. tadalafil online australia buy cialis from india Continue reading more about the benefits of sports nutrition has the profits. Driver Ed Texas makes sure that teens learn to identify and address the cause of the condition. discount viagra canada L-arginine is used for erectile dysfunction and can be found in the pill form, oral jelly form, generic levitra online in the form of chewing gum and polo ring type.
Aside from being grab-and-go simple, there is another advantage to this jig over most of the others I’ve seen: because it’s guided by the bushing, you can use this jig from any position around the table. It also doesn’t require that you have a miter slot in your router table, though I do. The downside is that your router table has to be able to accept guide bushings; many don’t, especially those with homemade mounting plates.
I’ve always made my own mounting plates using 3/8″ polycarbonate, so in order to use this jig I needed to make a new plate that would work with guide bushings. This turned out to be less difficult than I imagined. The secret is to have a rabbeting bit with interchangeable bearings. Here’s what I did:
- Cut the plate to rough size.
- Secure the existing mounting plate to the new one with double-sided tape and trim to final size/shape using a flush trimming bit and handheld router. Mark the mounting screw hole locations with a fine marker.
- Take the factory subbase and secure it in the middle of the new plate, using the marked screw hole locations as a guide, with double sided tape.
- Drill a starter hole in the middle of the bit opening, then trim to match the factory opening with the flush trim bit.
- Drill mounting holes while everything is in position, then remove the factory baseplate.
- Set the rabbeting bit for a 1/8″ rabbet, 1/8″ deep. Rabbet the top side (as it sits in the table) of the bit hole.
- Set the rabbeting bit for a 3/8″ rabbet 1/4″ deep. Rabbet the underside of the bit hole. This provides clearance for the nut that secures the guide bushing and makes up for the fact that my mounting plate is thicker than the factory subbase that takes the guide bushings.
- Drill countersinks for the router mounting screws.
- Remove the paper backing from the mounting plate and install the router.
The rabbet in the factory baseplate for the guide bushing is actually 3/32″, but I couldn’t find a 3/32″ rabbeting bit so I used the 1/8″. When I install a guide bushing I use a centering cone chucked into the router to make sure that I have the bushing centered before I tighten it down.
Recent Comments