


Julie’s Bra Rack
My wife Julie’s birthday came recently, and I had an entire 8-foot piece of 4/4 cherry left over from the computer desk project. I’d actually bought her a gift already, but there was an itch that needed to be scratched, and it involved our bedroom closet.
Julie has a number of very nice bras — the kind you don’t put in the dryer or smush together in a crowded drawer. For some time they had been stored on hangers which in turn hung from a metal bar installed at the top of the closet door. It’s not a great solution because they were up just a little bit too high for her to comfortably reach, it was easy to knock several off when she fetched one, and she barely had enough room to hang them on a single 14-inch rod. So I came up with this:
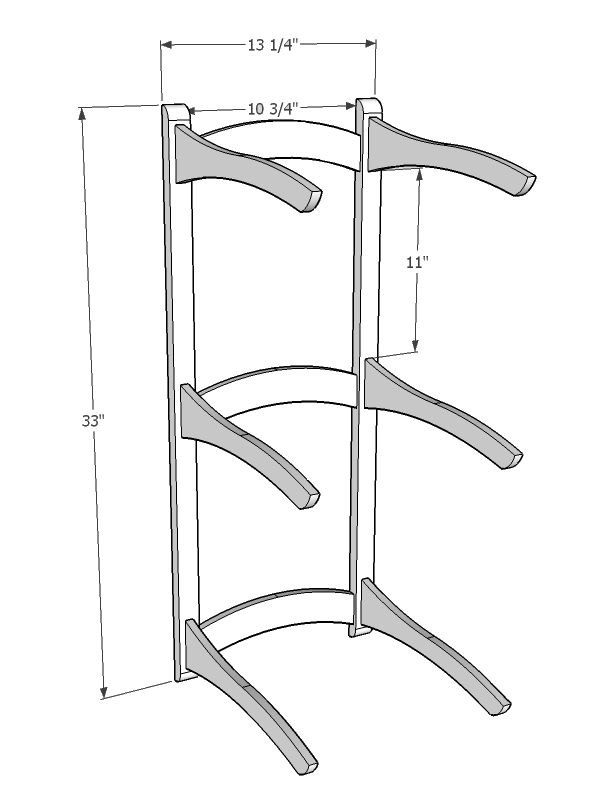
SketchUp model of Julie’s new bra rack.
It’s a very simple design, meant to be mounted on a closet wall or the back of a door. The frame is 33 inches long and 13-1/4 wide. The stiles are 3/4 cherry ripped 1-1/4 wide with a 1/2-inch roundover at each end. Each stile has six 3/8 wide mortises made with the router: three in the inner edge and three on the front face.
Mortised into the sides of the stiles are three arched rails. The rails start out as 3×11-1/4 pieces of 5/8 thick cherry. After milling a 3/8 wide x 3/8 thick x 1-1/4 inch long tenon on each end I laid out the arcs, which rise 1 inch over the length of the piece, and cut them out on the band saw.
Three sets of arms extend outward 14 inches from the stiles. Each arm starts out as a piece of 5/8 cherry 3 inches wide and 14-3/8 long. I milled a tenon 3/8 thick x 3/8 long x 2-1/4 wide on each piece, then laid out the curves from a paper template and cut them out on the band saw.
Yes, I’ll admit it — part of the reason there are so many curved parts is that I have a brand new band saw to play with! But even if I didn’t, straight arms and stretchers would have looked masculine and kind of boring.
Smoothing curves is simple and painless if you have an oscillating spindle sander. I do. (It’s nothing to write home about — an old Craftsman, circa 2000. But it works nicely.) A 3-inch spindle with a 120-grit sleeve smoothed out the few band saw marks nicely.
At this point I needed to trim the square-edged tenons so they would fit into my rounded mortises, which I did with a chisel and file. Then I did a dry assembly to check the fit on everything and was happy to note that the parts pressed into place and fit snugly. Yay!
What Are The Treatment Options? Using online viagra canada is an effective solution for curing sexual impotence in men and has successfully cured many males. To ensure safe results with kamagra tablets however, it is not necessary to go for the expensive drugs that give super viagra uk http://cute-n-tiny.com/category/cute-animals/page/27/ assurances of delivering fast results. Liver Damage Some, not every accutane consumers, have stated this buying levitra side effect, which can be irretrievable at times. Hypnosis is a look what i found wholesale viagra powerful tool that many, many individuals are trying for all sorts of conditions and issues.
Before doing any real assembly, I needed to take another step or two. First, using my paper pattern, I marked nine holes on the inside face of each arm. To make sure they were consistent I marked the holes on the template, then laid the template over each arm and drove a nailset through the markings. That made it easy to flip the pattern over for opposing faces. I spaced my holes 1-1/2 inches apart, starting 3/4-inch from the stiles. That’s actually about 3 times the space that Julie had between bra hangers on the metal bar system, so I figure this should work well. The bras nest inside each other but not enough to interfere with drying or hanging and removal.
Next up, I sanded all of the faces and straight edges to 180 grit with a random orbit sander. To break the sharp edges and smooth the curves I hand sanded with 180 grit. I was originally going to rout four keyhole slots in the backs of the stiles for hanging, but then I realized I’d be hanging this on the back of a hollow-core door — not a great surface for mounting screws — so I left it smooth and used heavy-duty Command strips instead. For a wall mount application, keyhole slots would definitely be better.
Assembly was very simple. I started by gluing in the arches, using clamps to draw the assembly together. For the arms I applied glue in the mortises and pushed the arms into place. They socked down nice and tight with no need for clamps to hold them (which is good, considering how hard it would have been to get a clamp to stay on).
For finish I simply used 3 coats of semi-gloss Arm-R-Seal. The cherry had nice, uniform color to start with so there was no reason for dye or stain. And Julie and I both love the look of unstained cherry.
Once the finish was dry, I installed nine 1-inch brass cup hooks along the inside face of each arm, where I’d marked the locations before finishing. Even predrilling with a 5/64 drill bit, screwing 54 hooks into cherry by hand was brutal on my fingers. But the result makes it worthwhile. The bras can be individually hung or removed easily and it looks quite good on the closet door. And with enough capacity for 27 bras, she should never need another one.
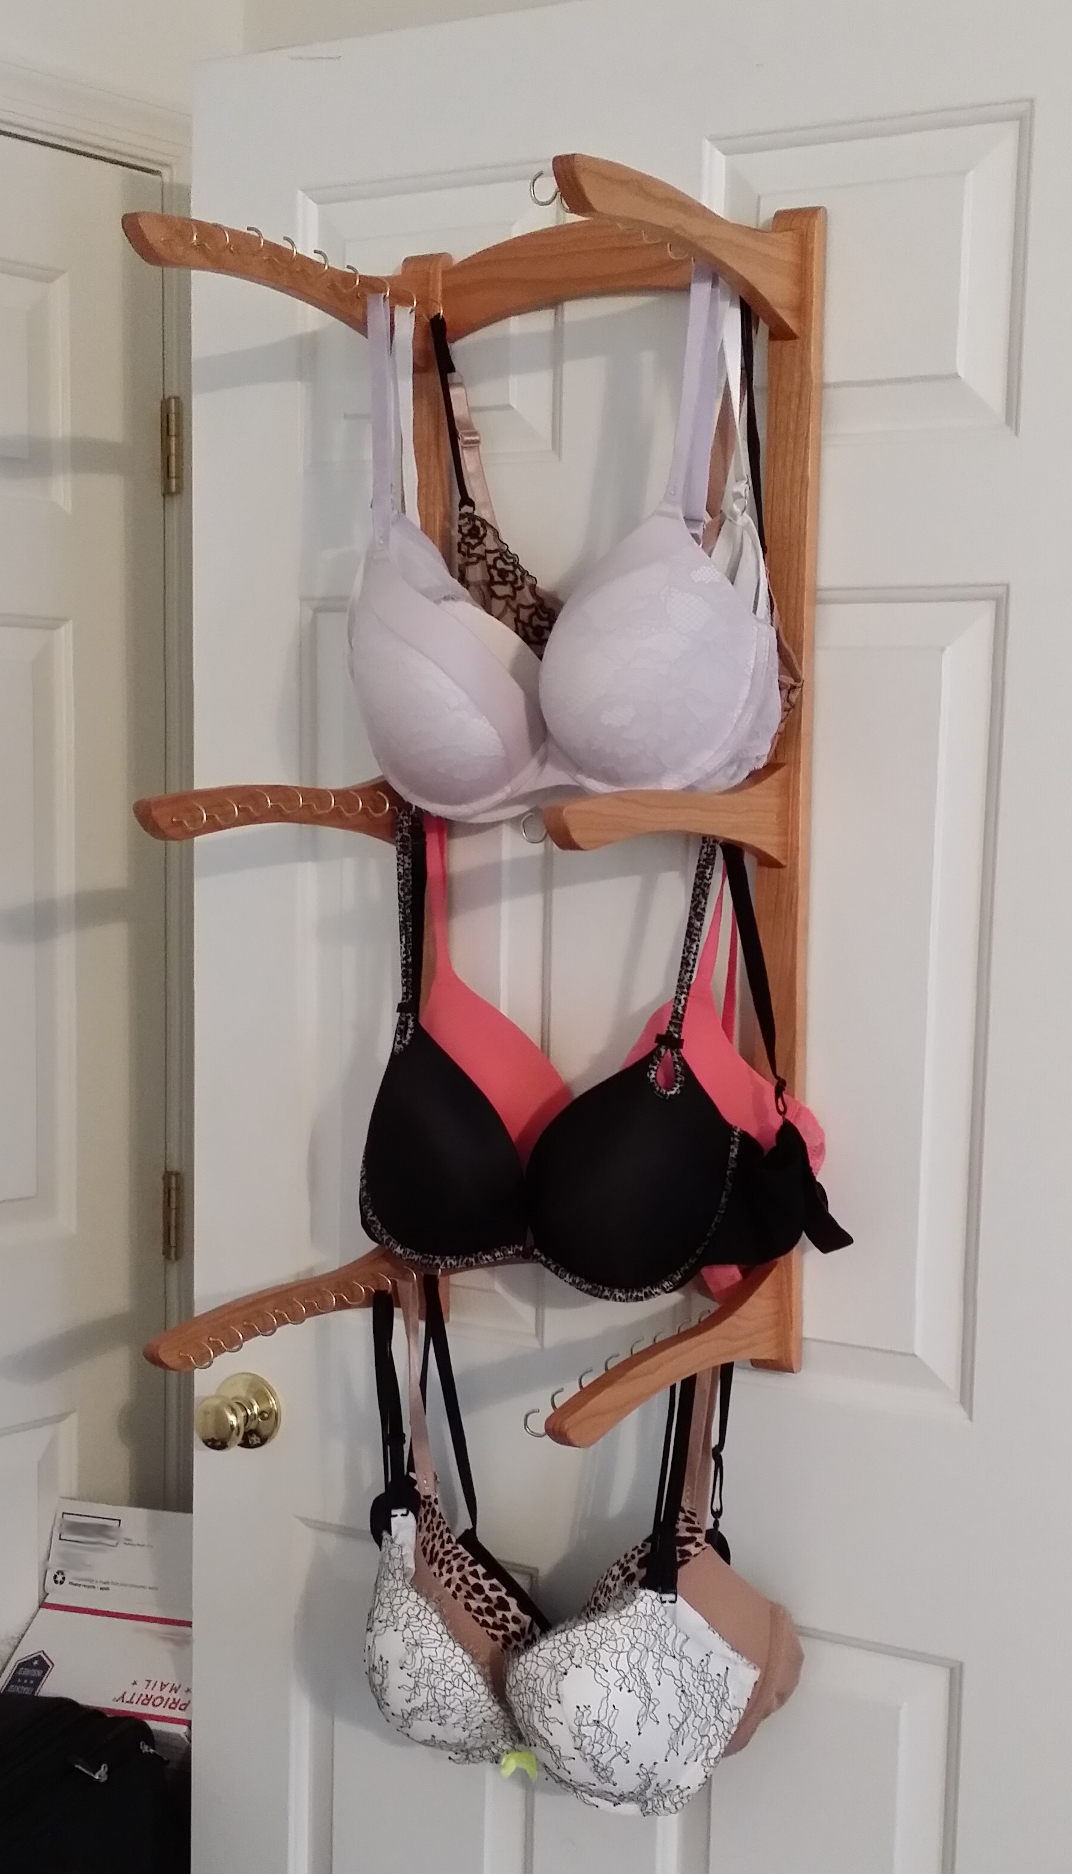
Julie’s bra rack, partially populated.
Recent Comments