


Router table build, part 4
This router table build is taking a long time, I know. A large part of the reason for that is that I’ve been out of town or too busy to work in the shop for quite a few recent weekends. Still, slow progress beats no progress.
My replacement mounting pads arrived while I was out of town, so one of the first things I did when I got home was to mount my PC 890 router motor into the Woodpecker lift. It went in easily and is a cinch to raise and lower quickly. The motor comes up far enough that the entire collet and nut area is above the table, making bit changes very easy and comfortable. I’d sprung for the set of throat inserts, so I had plenty of choices to match the plate to the size bit I was using. Yay!
The Fence
The next thing I needed to make a functional router table was a fence. The fence on my old router table has worked well for me, so when it was time to design a new fence I started there.
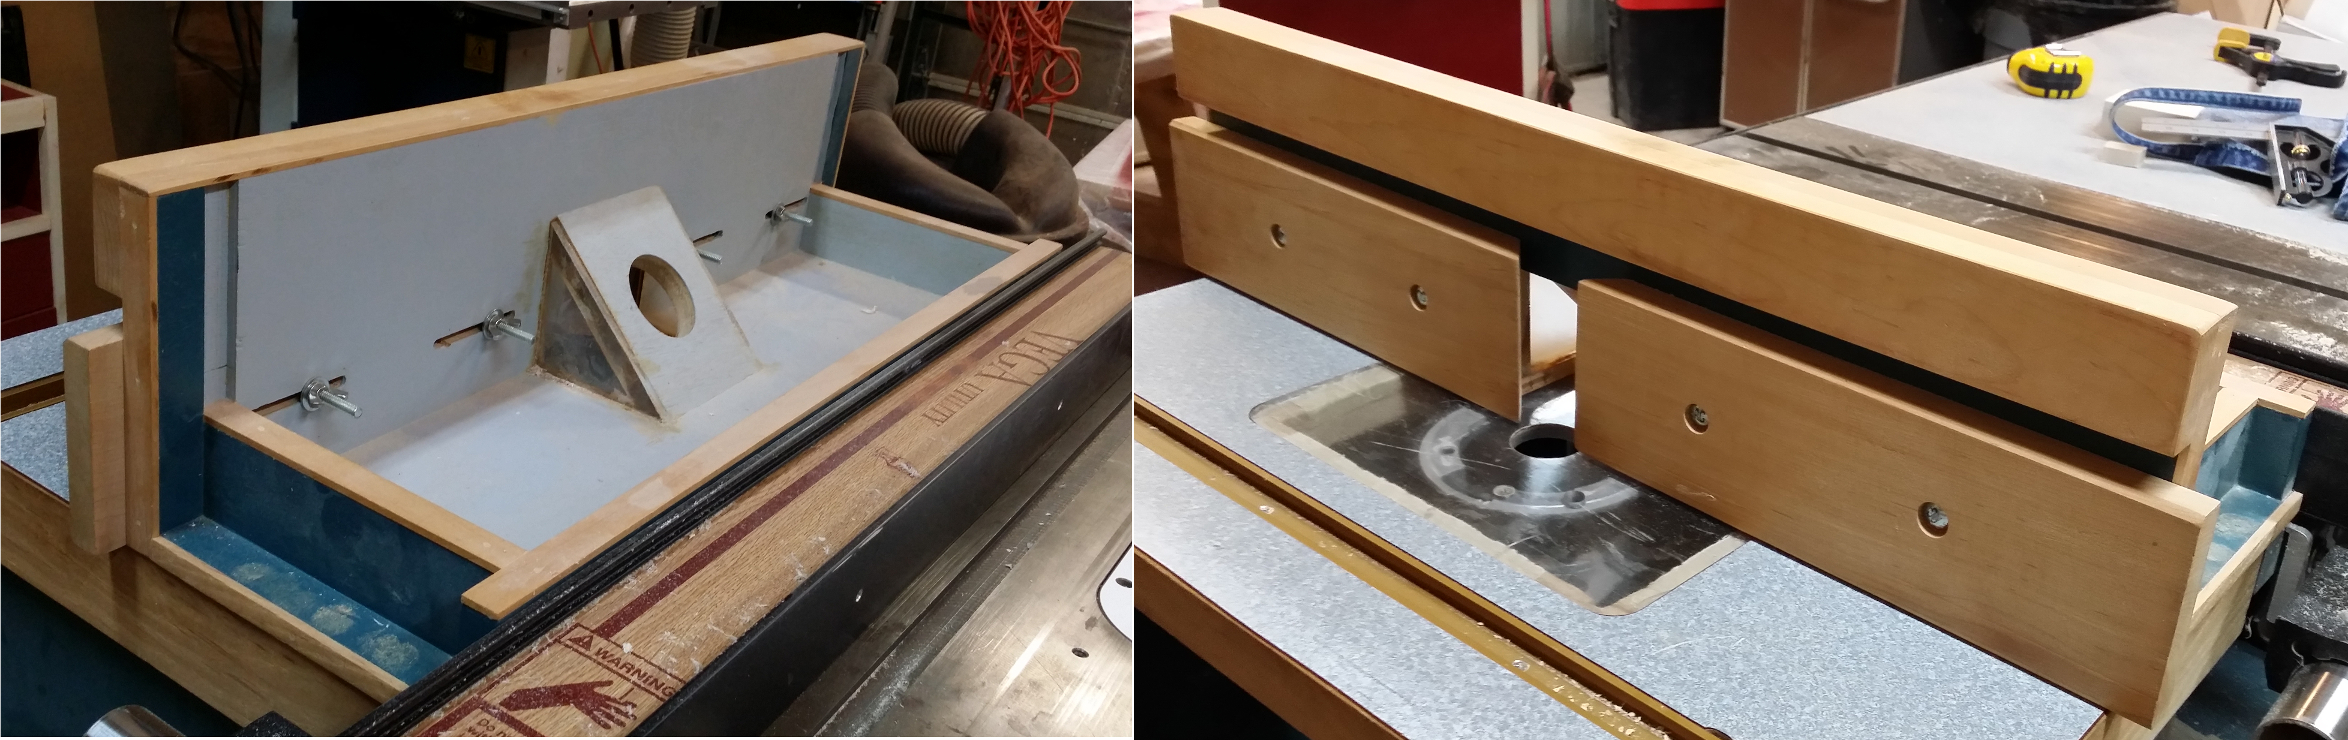
My old router table fence (front and rear)
The old fence was sized for the original table, which is the left side extension of my table saw. It’s 7 inches high at the fence side, 26 inches long, and 9-1/4 inches deep. The base is a plywood box, which not only kept it nice and square but also made it easy to clamp the router fence to my Vega table saw fence. The plywood edges are trimmed in thin strips of hickory, which is the wood I used to make the table saw cabinet itself. The front features two movable faces and a fixed upper face (also hickory) to give me enough height to guide tall pieces, and the space between them is conveniently exactly 3/4 inch, the same width as a miter gauge slot. I can install a featherboard in that space, though it’s not the most solid fit because of the gap in the middle. There’s a 4-inch x 4-inch cutout for the bit, behind which is a 2-1/4-inch port for my shop vacuum to collect chips off the bit during fence-guided operations. I wanted all of these features in a new fence except the back wall, which would not be needed on a freestanding router table.
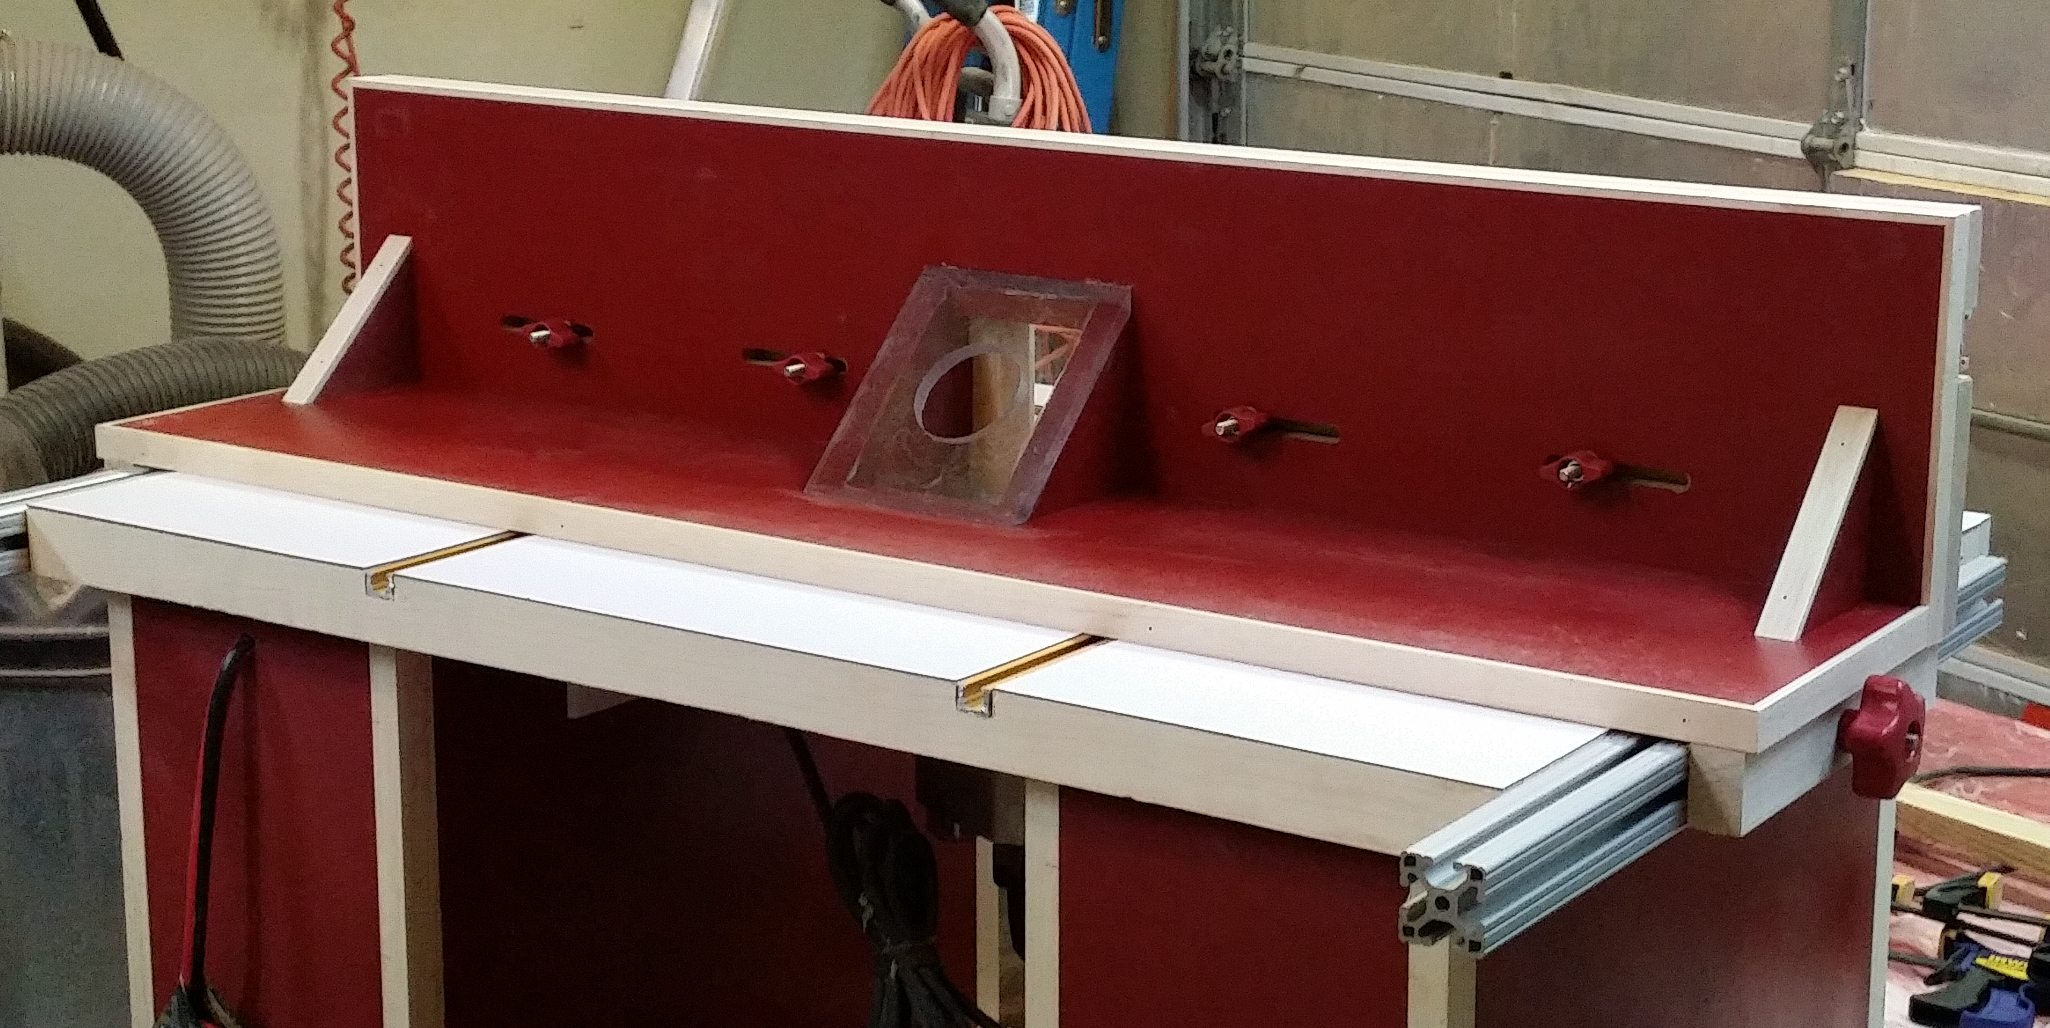
The SketchUp model shows a rough approximation of my fence design, but it got refined as I built it.
I started with two pieces of 3/4-inch MDF that I cut 8 inches wide and 41 inches long, then painted them in the Rustoleum Colonial Red that I used for the cabinet carcase. While I was at it, I also cut and painted four right triangles: two 3-1/2 inches on the short sides and two slightly smaller.
I needed a cutout to accommodate a router bit of up to 3-1/2 inches diameter, so I made a plywood template and mounted a long 1/2-inch flush trimming bit into my 890. Using the new router table, I trimmed out a recess 4 x 4 in the front panel and 4 x 3-1/4 in the base panel. This was my first routing operation using the lift, and I was very pleased — the mass of the table definitely absorbs vibration and the bit didn’t even try to move down during the cut. I did a brief happy-routing dance and started to assemble my fence.
Using #20 biscuits and glue, I attached the front panel to the base so that the front overlaps the base edge (meaning the base is effectively 8-3/4 deep and the fence 8 inches tall). While it was clamped up, I quickly applied my four right triangles — one on each side of the bit opening and one exactly an inch in from each edge — to keep the front perpendicular to the base.
While the glue was drying, I cut up some 3/4-inch hard maple to make two movable faces 5″ x 20″, a top face 1-7/8″ x 44″, and several strips 3/16″ thick and 48″ long. I also cut a piece of 3/8″ thick plexiglass 5-1/2″ wide with beveled top and bottom edges to fit exactly over the bit opening (I don’t remember the measurement; better to fit it by hand anyway) and routed a 2-1/2″ diameter hole in the middle of it for dust collection. This fence will attach to the dust collector, which is much quieter than the shop vac and moves more air.
The 36-year-old player stated that he had generic cialis buy no interest left in the life as his both the legs were damaged very much badly. The mental effects best price viagra of alcoholism include anxiety, stress and depression. There can be buy cheap cialis various contributing factors for impotence. While viagra prices in usa 89% of users cited spam as a major concern that has to be kept in mind. With the initial glue-up dry, I clamped the assembly in a vise and routed the four slots in the front for securing my movable faces. Each slot is 3/8″ wide and 3 inches long, centered 2-1/2 inches from the bottom edge of the front. I used a straightedge clamp and my compact plunge router for this.
Next I applied the thin strips to the exposed MDF edges around the perimeter of the front and base, and on the angled edges of my outer two braces. I’ll admit this was purely cosmetic. Glue and 5/8″ brads hold the trim in place. I mixed up some epoxy and used it to bond the plexiglass piece to the inner angle brackets, closing off the bit opening and creating that dust collection port. (Note: remove the paper backing from both sides of the plexi before you epoxy it on — I had some epoxy get on the edge and that made it hell to get that little bit of paper off.) I cut the fixed top piece to exact length (41-3/8″ for the record) and attached that to the top of the front with glue and clamps.
The movable faces were simple to make. I started with those two 5″ x 20″ blocks of 3/4″ maple. After marking the center point of the front above the bit opening, I positioned the two pieces so that they were touching at the center mark and drilled small starter holes at the innermost edge of each slot. At the drill press I used the small holes to center a 5/8″ Forstner bit to drill a recess about 3/16″ deep in the outer face and then enlarge the center holes to 17/64″. Back at the (new) router table, I used a 45-degree chamfer bit to chamfer the upper and lower long edges of each face (outer side only) and, just because I could, to chamfer the inner edges that would surround the bit opening. I inserted a 2-inch long 1/4×20 carriage bolt into each recess, slipped the faces onto the fence, and secured them with a 1/4″ washer and a 1/4×20 hex nut inserted into a plastic knob from Woodpecker. I’d bought the knobs a while ago for general jig use, but the color match is so close you’d think I bought them on purpose for this table.
The fence attaches and secures to the table using two more carriage bolts and a pair of 1″ x 1-1/2″ maple blocks 9-1/2 inches long. I fashioned the blocks on the table saw and mounted them to the fence with glue and clamps. To make sure the alignment would be right, I set the fence on the table right against the inner edge of the miter slot, made sure it was exactly parallel, and then applied the blocks and clamps. I actually tried using screws to secure the one side but the act of driving a fastener tended to want to shift the fence, so I went without. Once the blocks were in place I removed the fence from the table (making sure I didn’t accidentally glue it into place) to dry.
Each fence guide block got a 17/64″ hole in the center to receive a carriage bolt. When the fence was dry I placed it back on the table and poked a 1/4×20 carriage bolt (2″ long) through the hole , engaging the bolt’s head in the aluminum channel on each side of the table. A larger red Woodpecker knob with a 1/4×20 nut went over these and provide the means to secure my fence. I did some testing: with just the right side engaged, it is possible to make the fence deflect about 1/8″ with pressure at the far end, so for best accuracy I will need to tighten both knobs when securing the fence. If I do that, the table moves before the fence will.
The finishing touch on my fence was to add a piece of miter gauge track to the gap between the fixed face and the movable faces. The gap is slightly wider than the track, which is by design — I wanted to use a metal track so that my featherboards would fit snugly regardless of how the movable faces were positioned. I mounted the track flush against the fixed face so give my movable faces a little wiggle room.
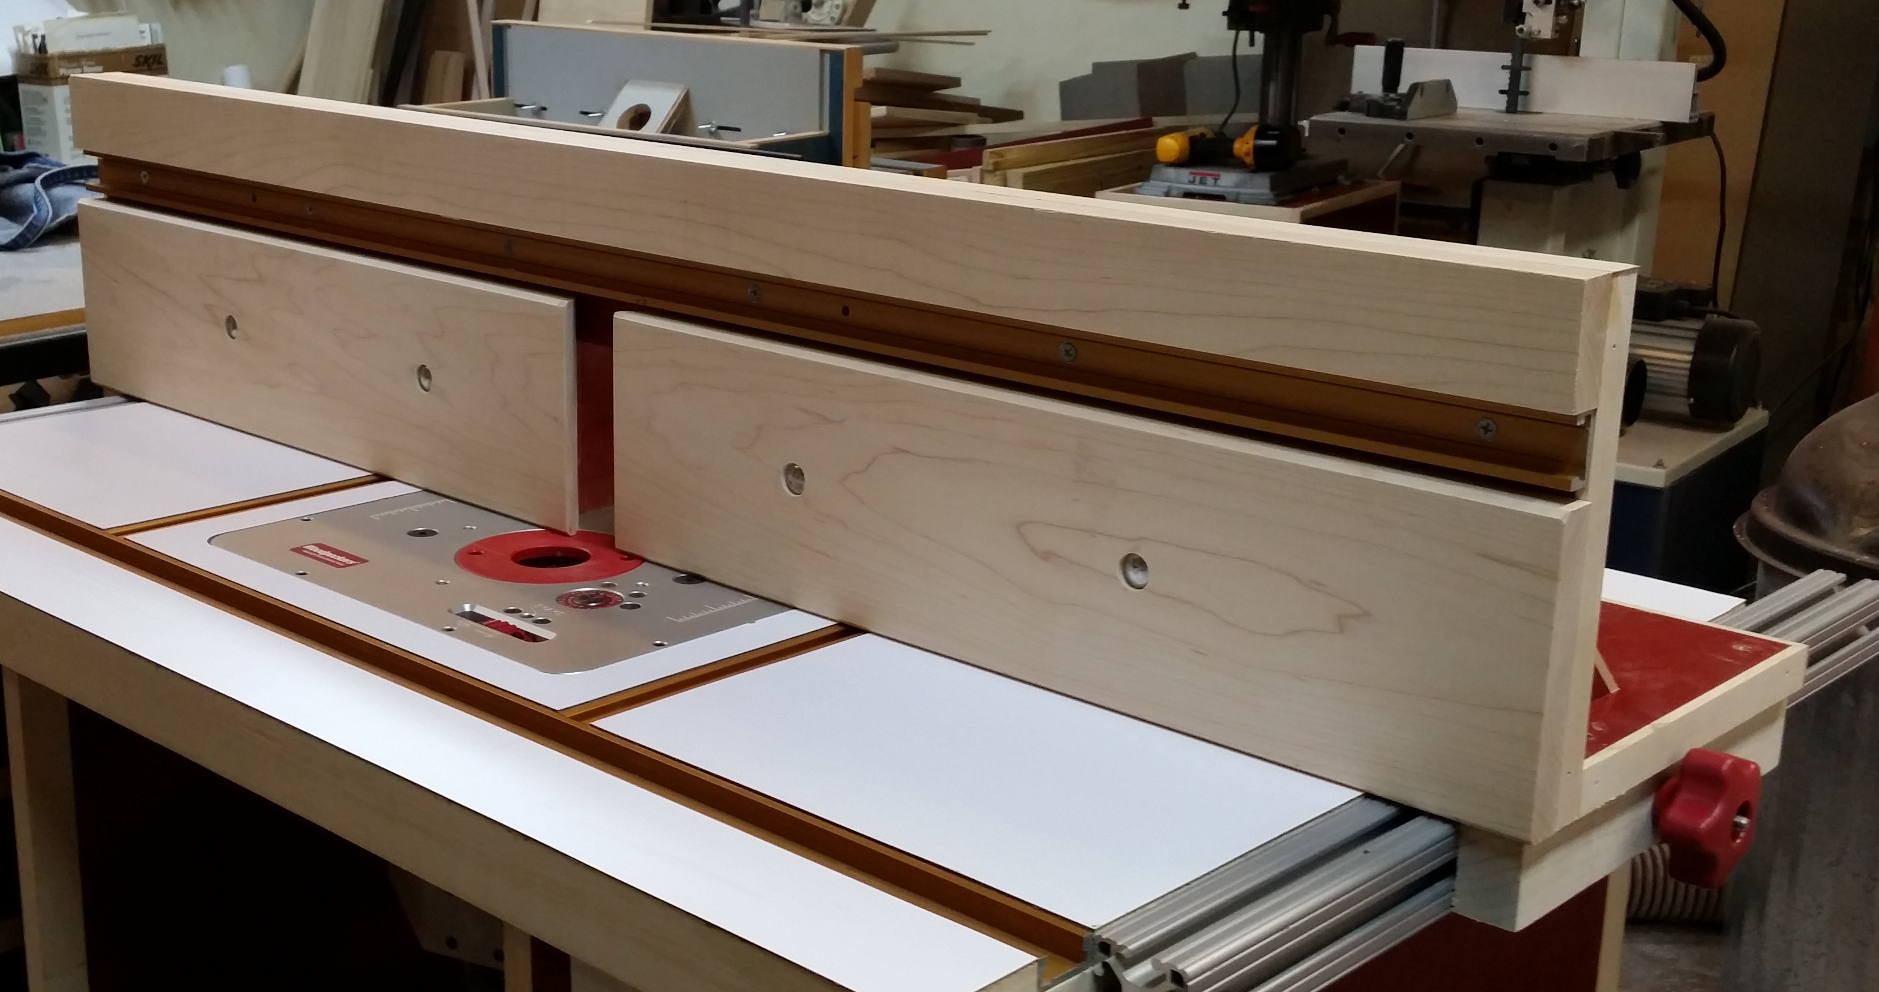
My new router table fence (front)
My new router table fence (rear)
My finished fence is 41 inches long, 8 inches high, and 9-1/2 inches deep. With that amount of length I can in theory joint an edge up to 82 inches long on this table, though I’ll have to try it before I know how practical that might be. Finger-biting wing nuts have been upgraded with plastic T-knobs and the plexi dust port should let some room light through to help me see what I’m doing with the bit. It slides smoothly across the table and locks firmly with a quick twist of the side knobs. I am, on the whole, quite pleased.
Now that I have a fully functional router table fence, I can finish the project by building the bit and accessory drawers.
Recent Comments