


Storage crisis 3
More storage! I’d really neglected this part of shop-keeping for the last couple of years and it showed, in the form of stuff piled in corners and me losing track of what I had and where it was. So forgive me for being a little self-indulgent here.
With the new drawers added to the old original storage cabinet, I turned my attention to the hodgepodge of glues, finishes, and finishing supplies. Many were sitting out in bins by the grill, and gathering sawdust. I needed to increase the storage space and at least try to minimize the amount of dust that got on that stuff. I figured it was time to take down the wood rack that was right above that original storage cabinet and replace it with actual shelves behind doors.
I started out with a drawn plan and a new source of sheet goods.
For the sheet good, I tried A&M Supply. They are maybe a mile from home, which made them very attractive for plywood because I would have to rent a truck, so mileage was minimal. And they had a new (for me) product I was interested in trying, which combined veneer core and HDF (High Density Fiberboard) on the faces. The resulting boards would remain nice and flat, but the veneer cores meant they will take normal screws and be stronger than just MDF while still having a nice, smooth surface for paint or laminate. I also picked up some plain Formica in black and stop-sign red.
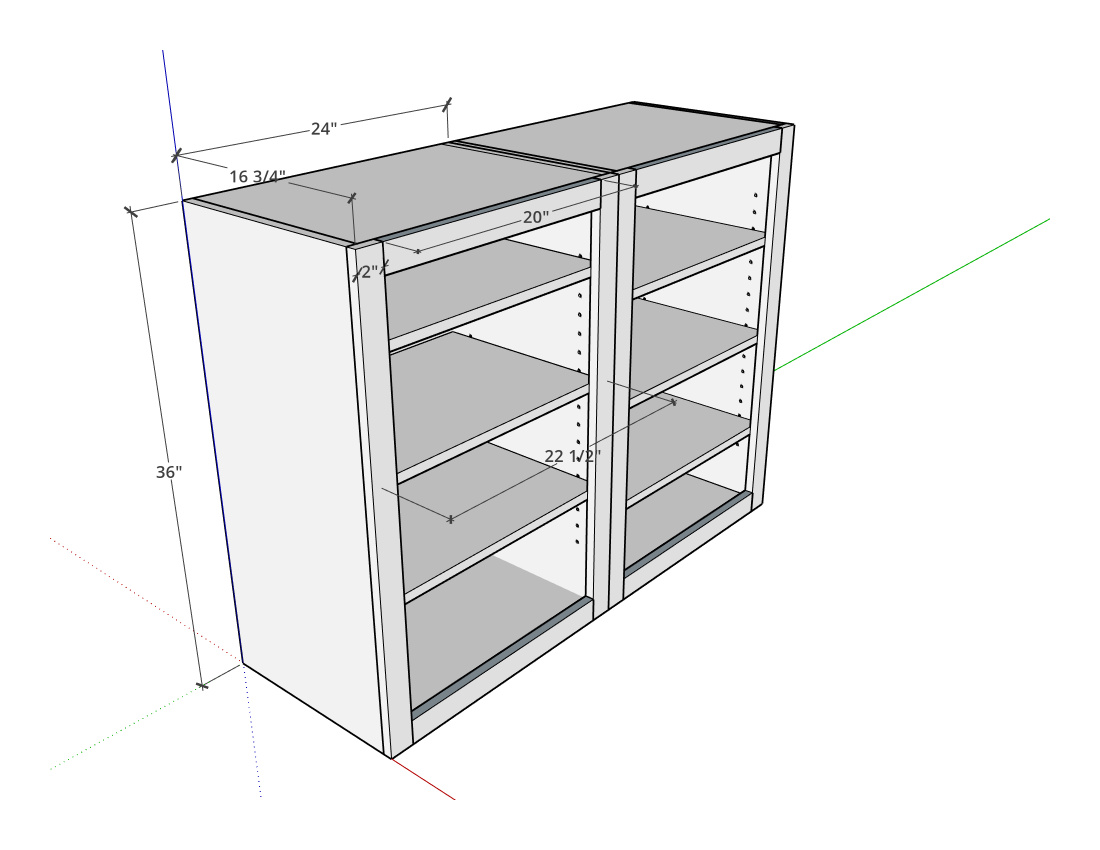
The HDF proved to be very easy to work with. The sheets were actually 48.5″ by 96.5″, so there was enough to cut 24-inch pieces and have a little left over for the saw kerfs; I appreciated that.
Since these were going on the wall, I wanted to keep weight down so these would be painted instead of laminated. First I cut the pieces to size, and went to town with the router to make dadoes at the back and corners and to cut the adjustable shelf pin holes. I used my Domino to do all the corner joints and grabbed a piece of hickory I’ve been hoarding for a couple of years to make doors out of.
I’ve made a fair number of cabinets over the years, but somehow I hadn’t really done basic hanging ones before. And as a result I made a few basic mistakes that don’t harm the function, but would not be acceptable in a kitchen or bathroom cabinet.
For starters, I was trying to maximize the yield of my wood so I actually cut my pieces in such a way as to get quarter-sawn grain out of a flat-sawn 8/4 x 8-1/2″ board. So my finished stiles and rails were only a little over 1-5/8″ wide, which is a touch on the narrow side. Especially for the Euro-style cup hinges I had.
I also realized that a single door 24″ wide would be kind of a pain, because that’s a lot of swing space. So I cut four more stiles and bisected my rails, making two doors for each cabinet instead of one huge one. And I decided to put in a center rail because the doors looked kind of flimsy without it.
Once those changes were made, I was temporarily happy with the doors. I had bought some 1/8″ plexiglass so that the contents of the cabinets would be easily seen, and that was easy to cut to fit. Then I fit the hinges, and realized that there is a very good reason why people usually makes the stiles and rails 2″ thick or a little more — my rails were not thick enough to accommodate the entire cup of the cup hinge! I ended up using them anyway, as the overage was only about 3/16″, but it’s only acceptable because it’s shop furniture. And I had to sand rounded cutouts into my plexiglass to fit it all together. Not recommended, but it did work.
For the shelves, I trimmed out both long edges with ash, because I had a scrap handy that was the right size. That would also make sure the shelves wouldn’t bow with the weight I intended to put on them.
So I took a couple of days applying spray paint — black for the outsides, red on the inside — and hard wax oil to the hickory parts. I pressed the plexi into place and secured it with wood trim and escutcheon pins, so that if the plexi broke at some point it would be easy to replace. I cut a couple of scraps of cherry to make the french cleats and attached them, and then hung them up in place of the old wood rack.
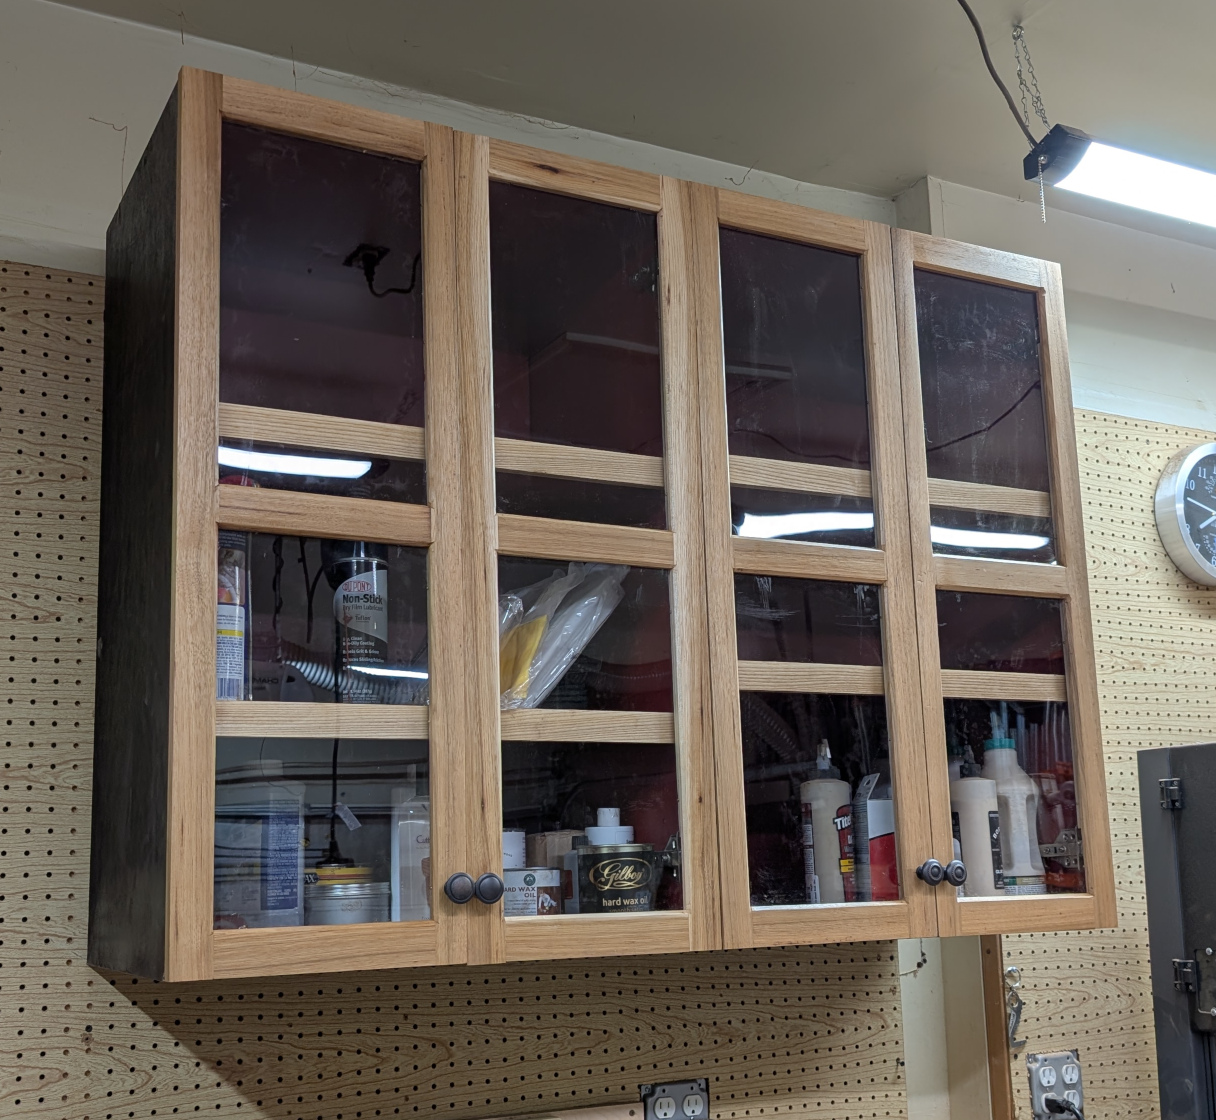
The top shelves will get used for things I don’t get into very often, but all my finishes and glues are now in one place and not in piles over by the grill anymore. And I have a new material that worked out very well.
There are 2 more storage pieces coming. Next up will be a floor-standing tool storage cabinet, followed by a new CNC table with drawers and scrap wood storage at the back. The 10-year-old plywood storage will get tossed, and large plywood pieces just leaned against the wall there, easy to get to when needed. Smaller cutoffs will go in the back of CNC table, unless I decide to make something dedicated to that purpose.
Leave a Reply